IRidium Gate for Global Cache 100
Program gateway iRidium Gate for transmitters Global Cache GC-100-06, GC-100-12 (18, 18R) enables connection to AV equipment from several devices at a time.
Unlike the range of iTach transmitters GC-100 modules do not support simultaneous connection of several devices. It means that you can control AV equipment through the transmitter from one device at a time.
iRidium Gate installed on your Windows PC enables direct forwarding of data to the transmitter establishing the constant connection session with it. At that iRidium Apps can connect to the gateway for controlling the transmitter without any limitation of their number. Connection to the gateway is possible via the local network and the Internet.
Contents
Principles of iRidium Gate Operation
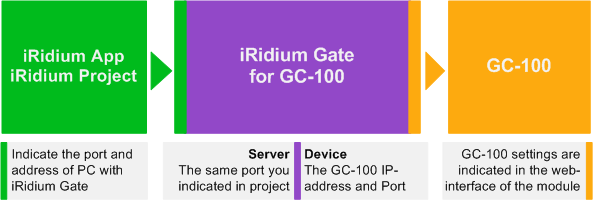
iRidium Gate enables receipt and further sending of data to the controlled equipment. iRidium Gate forms the general stream from several data streams coming from different iRidium Apps and sends data to the GC-100 transmitter. There is no additional data conversion.
Thus, iRidium App connects to iRidium Gate, and Gate in its turn connects to the controlled Global Cache transmitter.
iRidium App ТСР port of connection to iRidium Gate can be selected at random. The main condition is to indicate the same port in the settings of iRidium project and Gate.
Setting up iRidium Gate for GC-100
Setting up of iRidium project and iRidium Gate for working with GC-100 includes the following stages:
- Setting up connection of the project to the PC with installed iRidium Gate.
if you have one GC-100 modue in your project you have to just substitute the IP-address of the GC-100 controller in the project to the address of the PC with installed and launched iRidium Gate.- If there are a few GC-100 modules in the project you have to provide different ports for connection to the в iRidium Gate gateways. By default (for direct connetion to GC) 3 ТСР ports (4998, 4999, 5000) are used. But if there are several GC-100 in the project, each of them has a port by default (4998, 4999, 5000) and they work through iRidium Gate, the correct work will be impossible because of the incorrect data routing (the address and the destination port are the same for several devices and all data will be sent to the gateway of the FIRST project module, the rest will not be controlled). That is why it is necessary to indicate different ports of connection to Gate for each GC-100 module (for example, 4998, 4999, 5000 and 5001, 5002, 5003).
- Setting up of iRidium Gate: you have to create 3 gateways – one gateway for each control port of the GC module. Different control devices can send commands to each of these ports. The data routing for each port is performed separately (as for separate devices)
- Setting up of iRidium Gate auto start when starting Windows
Setting up Connection of iRidium Project to the iRidium Gate Application
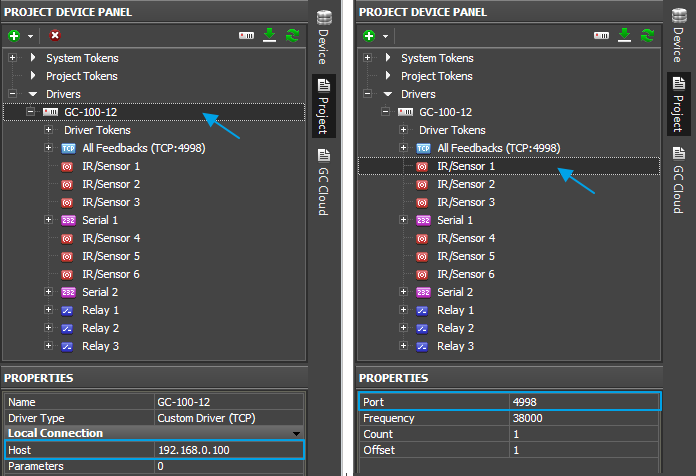
Select the preset Global Cache module you will connect through iRidium Gate in the iRidium project opened in iRidium GUI Editor. Change the IP-address of connection to the GC module to the IP-address of the PC with installed iRidium Gate.
Host - IP-address of PC with running Gate
Port - ТСР port of connection to the PC with running Gate
If there is only one GC-100 module then you can leave the default ports in the module settings (in the iRidium project). If there are several GC-100 modules, make sure that connection ports of different modules are not the same. For example, the port for sending IR commands and receiving system data is 4998 by default. We will leave it like it is for the first GC-100 in the project. Then the second GC-100 module in the project the port for sending IR commands and receiving system data should NOT be the same as it is for the first module. You can indicate any other ports after making sure that it is not used by some other application of the PC.
Save the project in iRidium GUI Editor and go to iRdium Gate.
Setting up iRidium Gate
In iRidium Gate you can create an unlimited number of gateways providing data transfer to various controlled equipment. At that several iRidium Apps can connect to one gateway (using one port) for simultaneous control of the equipment.
If you create SEVERAL gateways, the ports of connection to iRdium Gate, which are set up in the iRidium project should be different for each new gateway. It enables correct data routing:
To create a new gateway in iRidium Gate press the "Add Gate" button:
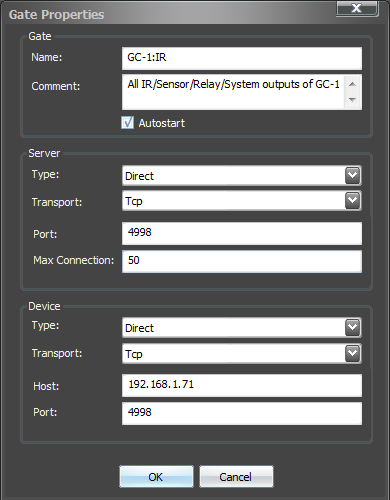
You will see the window for setting properties of connection to the gateway where it is required to indicate:
The "Gate" section of the gateway settings:
General information about the gateway
- Name: the gateway name (at random)
- Comment: the gateway description (at random)
- Autostart – activation of automatic start of the gateway at the start of the Gate application Gate (it is recommended to activate this setting)
The "Server" section of the gateway settings:
Settings of the server part (receiving data from iRidium control panels)
- Type: the type of the driver the gateway will receive data from
- Transport: the transport protocol of data transfer from iRidium Apps to the gateway (ТСР)
- Port: the port for connection of iRidium Apps to the gateway (the same you selected in the iRidium project)
- Max Connections: the maximum number of iRidium Apps for simultaneous connection to the gateway
The "Device" section of the gateway settings:
Properties of connection to the controlled Global Cache device
- Type: the gateway type (Direct – for direct data forwarding)
- Transport: the transport protocol used by the equipment for receiving data (UDP)
- Host: the IP-address of the Global Cache device in the local network (it has to be in the same network as the PC with running Gate)
- Port: the port of connection to the Global Cache device (it is 4998, 4999 or 5000 – depending on the data)
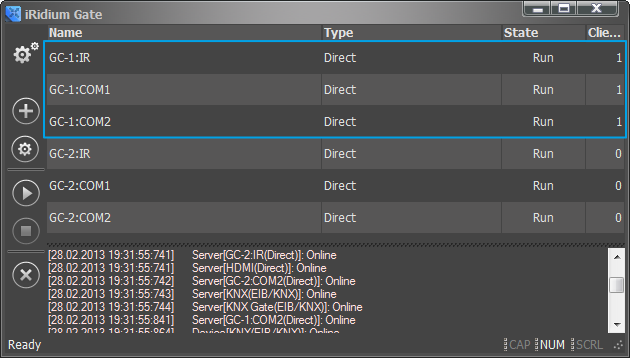
It is required to create 2 gateways for GC-100-06 or 3 gateways for GC-100-12 corresponding to the number of the transmitter control ports:
After filling in all settings press the ОК button. Then you can launch the gateway and finish setting up the Gate application on PC.
Launching iRidium Gate on PC
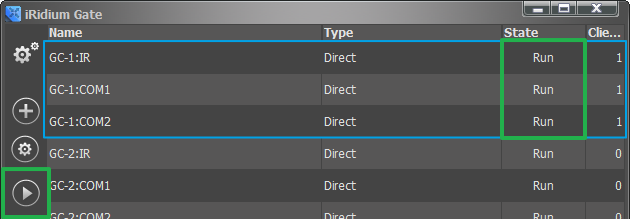
To launch the set up gateway select it in iRidium Gate and press the "Start" button on the side panel of the application. When the gateway status changes to "Run", it will be ready to receiving and redirecting data.
The number in the "Client" column shows the list of control panels (iRidium Apps) which are connected to the gateway at the moment.
Launching iRidium Gate with Windows
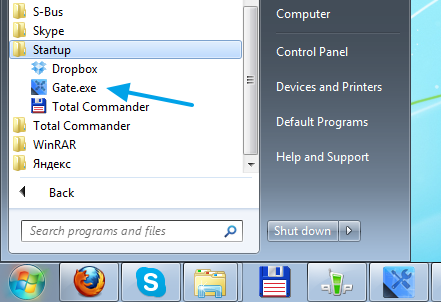
To launch iRidium Gate automatically when starting Windows drag the application icon to the Startup folder (in the Start menu) on your PC.
At that, please make sure that "Autostart" is ACTIVE in the settings of each of the configured gateways. Otherwise the Gate application will launch but the gateways in it will be turned off.
