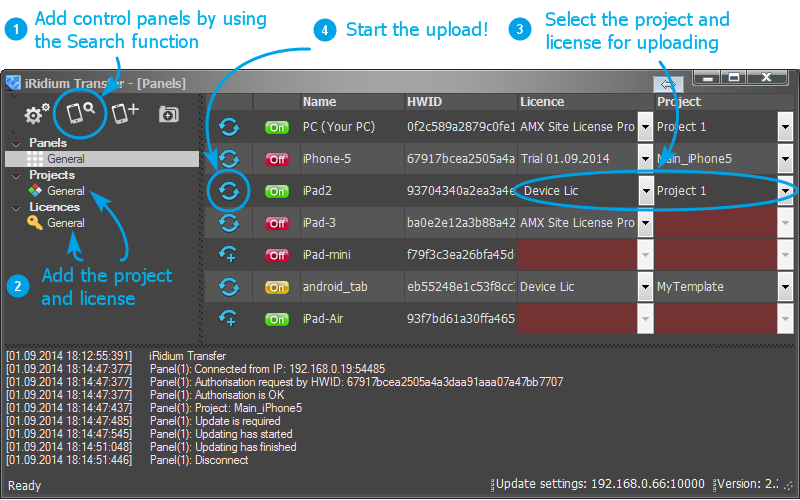
IRidium Transfer
From iRidium Mobile Wiki

|
iRidium Transfer project uploading on control panels actual version: 2.2 |
iRidium Transfer included in iRidium Environment for installation on Windows 7/8 based PC |
iRidium visualization project is a user interface (UI), drivers and scripts with settings for connection to equipment.
You can get the project ready only on a PC in iRidium GUI Editor or it can be received as a result of conversion from a project with another format (AMX TPDesign4).
You can download the ready project on your control panel with the help of Transfer or remotely – using an HTTP link to the project.
Upload of iRidium projects on control panels:
iRidium Transfer Interface
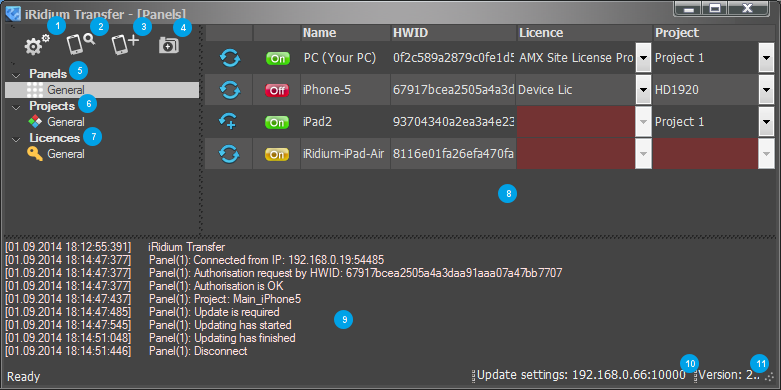
iRidium Transfer Interface:
- iRidium Transfer settings
- Search of control panels. It adds to Transfer all devices with the launched i2 Control application
- Manual adding of control panels. It is required to have HWIDs of control panels (they can be received only via Transfer at panel search)
- Creating a folder for grouping control panels
- The Panels tab opens the list of all control panels added in Transfer
- The Projects tab opens the list of all visualization projects added in Transfer
- The Licenses tab opens the list of all licenses added in Transfer
- The window where the lists of control panels, projects and licenses are displayed
- The iRidium Transfer log informs about the app status and the status of project uploading on control panels
- The project update address for indicating in i2 Control (the address of the PC with running Transfer)
- iRidium Transfer version
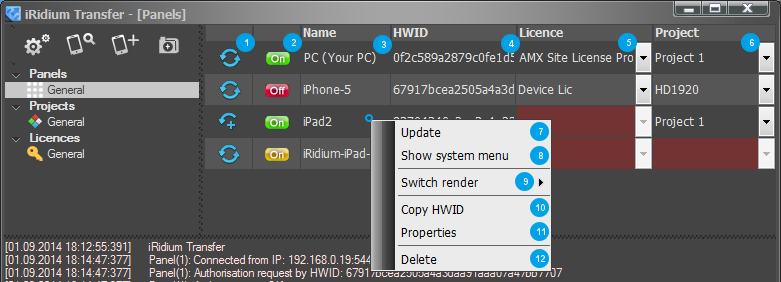
Panels:
- Reload: to start upload of a project on a control panel. The project and the license have to be selected from the lists beforehand. br />Two arrows mean that the new project and license will not substitute the ones which were previously uploaded.
An arrow and a plus mean that the new project and license will be uploaded in addition to the ones which are already uploaded on the panel (the Multi-design mode is activated in the settings of the control panel) - The status of connection of control panels to Transfer. See the meaning of the indicator colors below.
- The control panel. It can be changed in the settings of the control panel.
- HWID – the unique identifier of the control panel. It is used at licensing.
- Select the license file from the drop-down list (it is formed by the Licenses tab)
- Select the project file from the drop-down list (it is formed by the Projects tab)
- Upload the project on the control panel. It duplicated the Reload button.
- Open the menu on the control panel (the control panel settings in i2 Control)
- Switch Render for Windows (only for specialists). It changes the way of interface creating (rendering). Do not change it without consulting with iRidium technical support team.
- Copy HWID of the control panel.
- Open the control panel settings
- Delete the control panel from the list (it can be restored in the list by re-search)
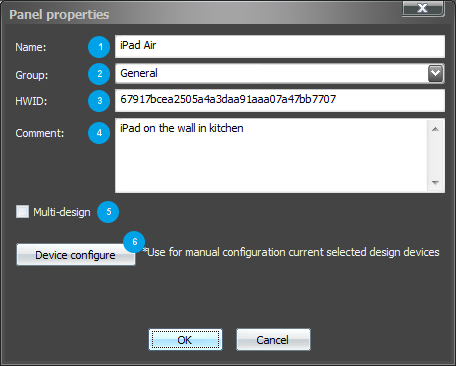
Control panel settings:
- The control panel name, it can be changed
- The folder where the control panel will be located
- HWID – a unique identifier of the control panel. It is used for licensing
- Comments, not necessary
- The Multi-design mode – on/off
- The settings of connection to equipment. They allow you to change connection properties in the project which is selected for the control panel. The changed properties will be used only when uploading the project on the control panel. Editing of these settings does not change the initial project.
Use: uploading of the same project on several control panels, for each of which you need to indicate specific connection properties (it is often used when working with AMX)
Projects:
- Add the visualization project in Transfer.
- Create a folder for grouping projects.
- Create an executing file of the project for Windows. The button generates a folder with the exe files and resources. During the generation you need to select the license file with which your exe file will work. After that the folder can be copied on any Windows PC and launch as the i2 Control client on Windows.
- The visualization project name
- The visualization project resolution in pixels
- The drivers which are used in the project
- Open the project settings
- Update the uploaded project from the initial source (when editing the project in iRidium GUI Editor, it is not updated automatically in Transfer)
- Change the source file
- Open the project settings
- Delete the project from Transfer (it does not affect the source)
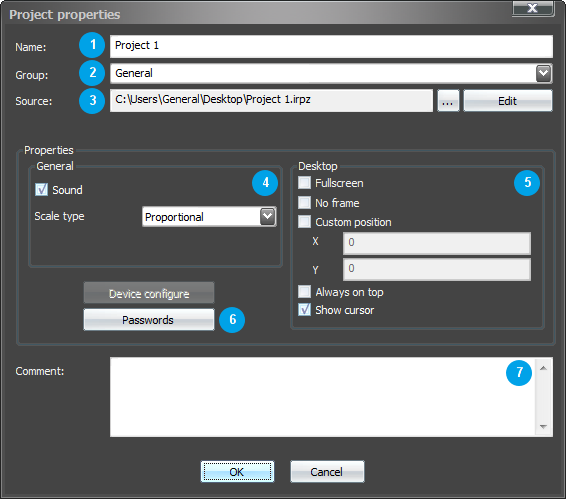
Project settings:
- The project name, it can be changed
- The folder where the project will be located
- The link to the initial project file (source)
- Main project properties:
turn sounds on/off in the project
select the way of scaling the project in i2 Control (see the settings in iRidium GUI Editor) - Project settings when working on Windows (see the settings in iRidium GUI Editor)
- Edit the list of project passwords. They are used when creating protected pages
- Comments, not necessary
Licenses:
- Add the license file (*.irl)
- Create a folder for grouping licenses
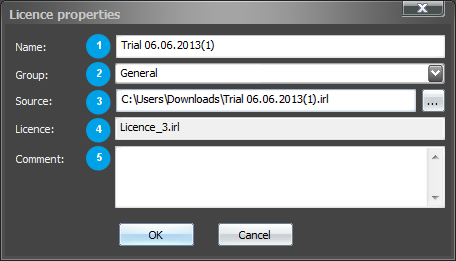
- The license file name, it can be changed
- The license type: Device, Site, Trial, Demo
- The HWID or serial number to which the license is assigned. HWID is not displayed of the corresponding control panel is not added in Transfer
- The drivers which the license supports
- Add the license file
- The license properties
- Delete the license from Transfer
License settings:
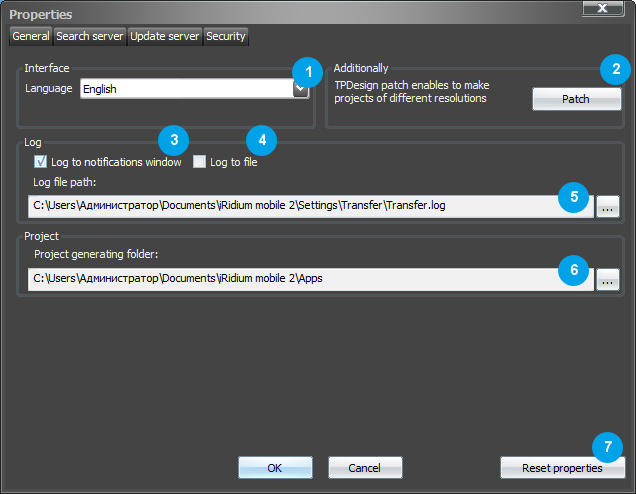
iRidium Transfer Settings
General:
- The interface language of iRidium Transfer
- The patch of the TPDesign4 editor: it adds new project resolutions for AMX developers
- Display the log of Transfer work in the window located in the lower part of the app
- Save the log of Transfer work in the text file
- The path of log saving
- The path of saving executing files for Windows, which can be created in the Projects tab
- Return the default settings
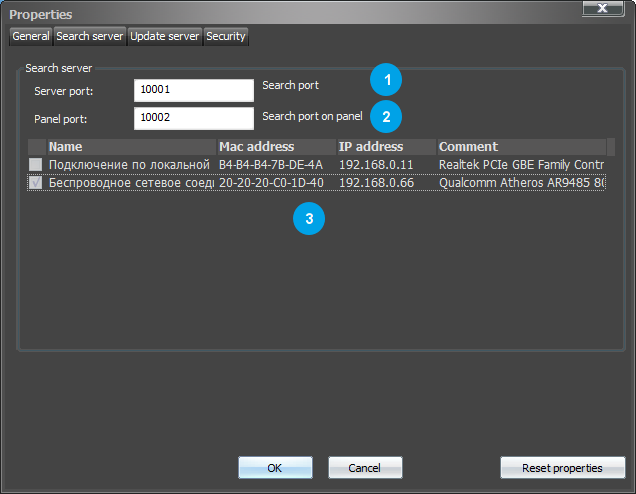
Search Server:
- The UDP search port opened on PC. It shouldn’t be blocked by the router.
- The UDP search port opened on the control panel. It shouldn’t be blocked by the router.
- The list of PC network connections. There have to be only ONE network connection at a time. Otherwise the Search function will not work. The control panel has to be connected to the same IP network.
Update Server:
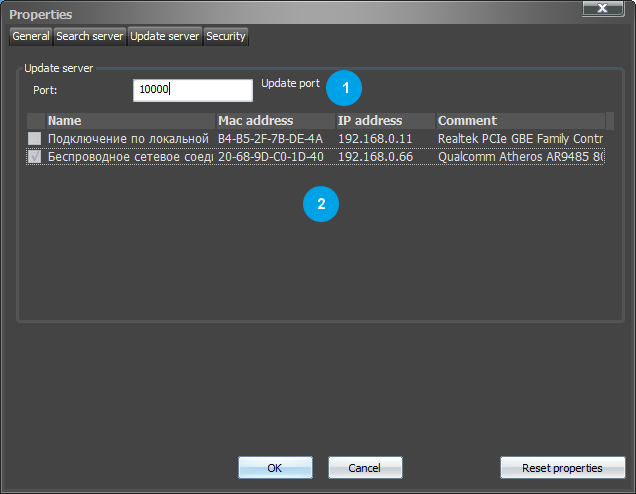
- The TCP upload port opened on PC and the control panel. It shouldn’t be blocked by the router or anti-virus software. The port of project upload can be changed in Transfer and on the control panel if it is busy with other app.
- The list of PC network connections. There have to be only ONE network connection at a time. Otherwise the Search function will not work. The control panel has to be connected to the same IP network.
