Switching from iRidium 1.5 to 2.0
Here you can find information about what is new in iRidium 2.0 version and if you need to switch to iRidium 2.0 if you worked in iRidium 1.5.
Reasons for Switching to iRidium 2.0 Version
In spite of the fact that iRidium 1.5 version provides ample capabilities for control and visualization, sometimes it was not enough for some specific control tasks for engineer and Audion-Video systems.
Therefore the iRidium core was fully redesigned what opened new capabilities for integrators of automation systems:
- Full support of two-way communication with Audio-Video equipment
- Working with lists of Media Servers (Sonos, XBMC, ...)
- Script system which allows you to control the interface graphic and driver parts
- Uploading projects on control devices without restarting the application
- Full setting up of connection to equipment and displaying the project on the control device
- Creation of macros which contain activation of script functions and URL schemes besides standard commands, delays and navigation tools (switching pages)
- More native and ready script drivers
- Intuitive and stable GUI Editor
- More АМХ commands
- Expanded license system
- New, more convenient and detailed information system - Wiki
- Training Academy for installers with webinars and certification allowing to receive special deals
- Creation of custom drivers for controlling any systems
- and more...
At the same time capabilities of iRidium 1.5 version are still available: you can download the application for this version on the AppStore, Wiki contains information about working with it. If you need to edit 1.5 projects you can use the corresponding iRidium Environment.
Using 1.5 Projects in iRidium 2.0
While switching to the new iRidium version be careful when saving 1.5 projects for working with the new version. Save copies of initial 1.5 iRidium projects!
Download iRidium 2.0 version from the web site iridiummobile.net, start iRidium GUI Editor and open your project in it (Open file). You will see the message that the project was created in the previous iRidium version and is required to be converted. Check if you saved the initial project in a separate directory and start the conversion:
After the conversion you will receive your project with all its pages, buttons and navigation commands but possibly without drivers in the Project Device tree. At the moment the following native drivers can be converted from iRidium 1.5 version to the new one:
- AV Control (AV & Custom Systems)
- AMX
- KNX
- KNX IP BAOS
If you work with other drivers, you have to form the device tree anew as in the new version many drivers were redesigned and it is not possible to transfer all data from the old version to the new one. If your driver cannot be converted use import or scanning tools for forming the device base. After that assign commands and channels to project items.
Main Distinctions of the new iRidium Version
When working with new version of GUI Editor you will face various changes meant to make the process of project creation fast and easy. You will also notice the following concepts of driver creation:
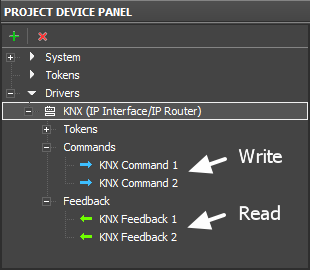
1. Now the Project Device tree contains separate branches for storing commands and feedback channels.
There are no channels with the Read/Write type any more. Only Write - Commands and Read - Feedbacks:
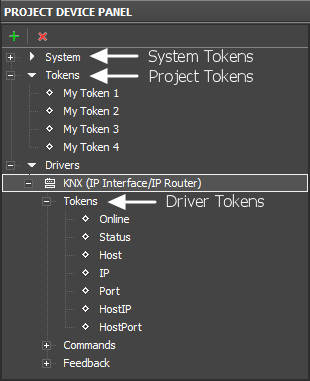
2. There are 3 new variable types (Tokens) in the Project Device tree
- System Tokens – work for reading only. They allow you to receive various properties of the control device such as system time, battery and network status, etc.
- Project Tokens - work for reading and writing. You can write any value or text from the driver or items and then use the value in the project. Tokens are not cleared at the project launch if you Токены не перетираются при рестарте проекта, если unmark the Clear Token check box in the System tab of Project Properties.
- Driver Tokens - work for reading only. They allow you to receive various driver properties connection status, host and port of the controlled driver, etc.
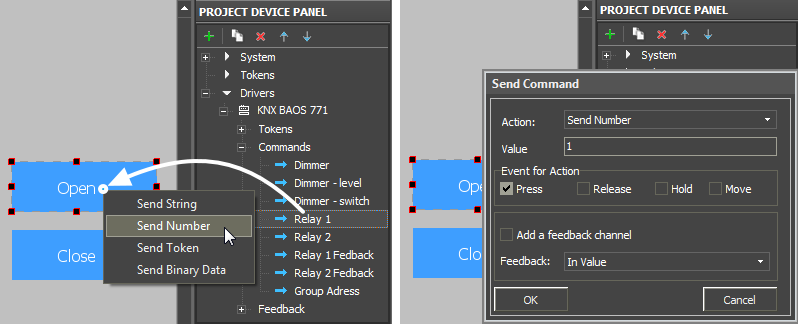
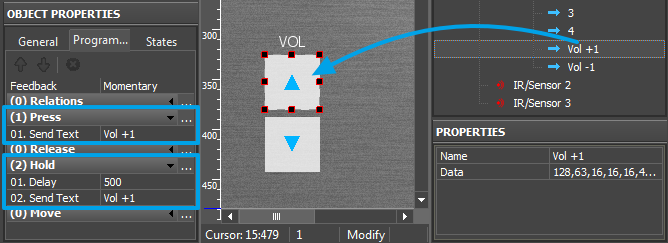
3. There is an advanced dialog when adding commands to graphic items.
When working with a command you are required to select the type of data which will be sent to the controlled variable:
- Send Number – a decimal number, a constant. It is indicated when dragging the command to the item.
- Send Token – the variable defined by the Level slider, etc. It is always used when you need to send the value from Level, Trigger Button, Up/Down Button
- Send String – send ASCII strings
- Send Binary Data - send data in the binary format
After selecting the data type a dialog window will open. You are required the following data there:
- Outgoing value
- Event the command will be sent to the controlled equipment at (it can be changed later)
- It is required to create a feedback channel for the command (the channel will have the same name and properties as the command). The option is convenient when creating buttons which have to receive data about the variable status.
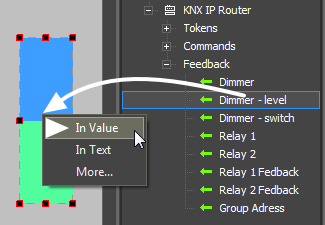
4. There is an advanced dialog when assigning channels to graphic items.
When assigning the channel indicate the item property which will be affected by the selected channel:
- In Value – the channel affects the Value property - the graphic item state. When he register goes to any non-zero value if it is Button the graphic item will change its state to the active one (from State 1 to State 2); if it is Level the item will change the slider position.
Also In Value is used for working with complex graphic items - Trigger Button, Up/Down Button and participates in calculating the values these items need to send to the register.
In Value is used when working with templates for processing the ingoing data and displaying them on the item ($V, $P, $F1, ...) - In Text - the channel writes the value received from the register in the item text field substituting the text in it. The absolute value without conversion is written there. That is why this type is NOT used when working templates for processing the ingoing data and displaying them on the item.
- More... - when it is necessary you can set up more complex ways of the channel affecting the graphic item properties. For example, the register value can change coordinates or item opacity level, it can make it inactive for pressings or invisible.
5. Assigned commands and channels are stored in the Programming tab of the graphic item. They can be also moved to different events and included in macros for events of the graphic item.
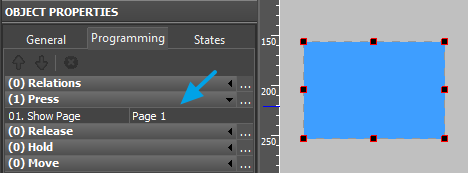
6. Navigation commands (switching pages and popups) are also stored in the Programming tab and can be included in macros:
Here you can also set up URL schemes, commands for controlling equipment, referring to tokens, etc.
7. There is the "Send to Panel" button in GUI Editor. It enables you to upload the project on your control panel (iPad, Android, Mac, Windows) with just one click.
When using this tool for the first time the transfer application will open and offer to select the control panel (from the list of the previously added ones) where you want to upload the project. After selecting the panel the project uploading will start (if iRidium App is opened on the panel). When using the "Send to Panel" tool next time the uploading on the panel will start automatically.
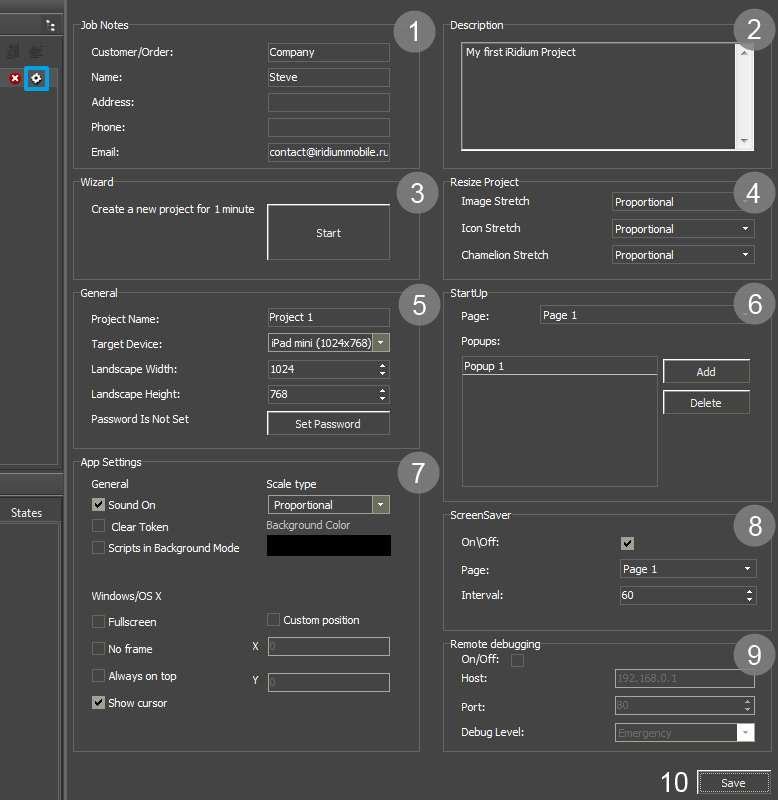
8. All project settings including sounds, start pages, screen savers, full-screen mode and scaling type can be set up in GUI Editor:
9. You can create scripts on the basis of the JavaScript language converted to iRidium Script due to iRidium new functions. You can create new drivers, control interfaces and ready native drivers with the help of scripts. You can find more information about working with iRidium Script in iRidium Script API and iRidium DDK.

