Controlling Equipment in the Helvar System
Contents
- 1 Controlling Devices and Groups
- 2 Requests and Emergency Tests
This section presents examples of commands to devices in the Helvar system. The commands can be activated with the help of various control items. Ways of receiving data about the equipment state are also presented here.
Controlling Devices and Groups
Commands for controlling devices and groups of devices in the Helvar system:
| Command to Device: | Command to Group: | Description: |
| Direct Level (Device) | Direct Level (Group) | Setting up the status |
| Recall Scene (Device) | Recall Scene (Group) | Recalling scenes |
| Direct Proportion (Device) | Direct Proportion (Group) | Setting up proportions |
| Modify Proportion (Device) | Modify Proportion (Group) | Modifying proportions |
"Direct Level (Device/Group)" – Setting up and Requesting the Status
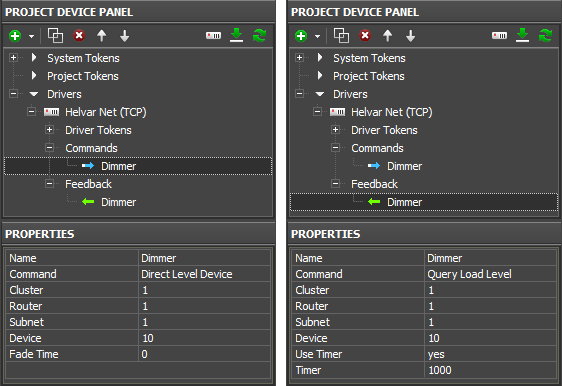
In order to send values to a device or a group of devices in the Helvar system, for example, to lock/unlock relays, set up the dimmer brightness and display the actual status in the project "Direct Level Device" and "Query Load Level" commands are used. They have to be set up in a particular way.
- Direct Level (Device/Group) – the command of setting up the status. It send the value the device or group of devices should take
- Query Load Level – the feedback channel requests the status of the controlled device and sends it to the interface with a particular frequency (for separate devices only).
Thus the set for controlling devices in the Helvar system consists of the command of setting up the value and the feedback channel for monitoring the device status:
Commands – commands to devices and groups of devices
- Command: Direct Level (Device/Group) – setting up the status (switching the relay, controlling brightness)
- Cluster (1..253), Router (1..254), Subnet (1..4), Device (1..255) – the device address (@ address)
or Group (1..16383) – the address of the group of devices in the Helvar system - Fade Time (мс) (0..6553.5s) – speed of changing the status from the current to the preset one after receiving the command of setting up the status
The status value for setting up is selected in "Value" when dragging commands to graphic items.
Feedbacks – feedback channels for displaying the status of devices
- Command: Query Load Level – requesting and displaying the device status
- Cluster (1..253), Router (1..254), Subnet (1..4), Device (1..255) - the device address (@ address)
or Group (1..16383) – the address of the group of devices in the Helvar system - Use Timer: Yes – requesting the device status by timer (HelvarNet does not send the status without the request). If the timer is off, the device status will not be received.
- Timer, ms: XXXX – frequency of sending requests about the device status (in ms) – how often information about the device state should be updated in the project. The less often is the update, the less load there is on the system.
Graphic items for setting up values (status):
When commands and feedback channels are set up it is required to assign them to graphic items. You can use the following types of graphic items:
- Level – for regulating the brightness value in the preset range by moving the Level slider. It can be used for controlling one device or a group of devices.
- Button – for sending a particular value. It stores and sends the selected value to the address of the controlled device. It can be used for controlling one device or a group of devices.
- Trigger Button – for switching two preset brightness values, for example, 100% and 0% for brightness or 0/1 for relays. The values are indicated in the process of setting up the graphic item. The value for sending at the next pressing on the item is defined depending on the current value received via the feedback channel. That is why the item is used for controlling separate devices.
- Up/Down Button – for incrementing or decrementing the dimmer value in relation to the current one which is received via the feedback channel. That is why the item is used for controlling separate devices.
Setting up Values by Button
Create Button with 1 or 2 states. With the help of Button you can send any value in the system after defining the available value range depending on the device type – relays (0-1), dimmers (0-100).
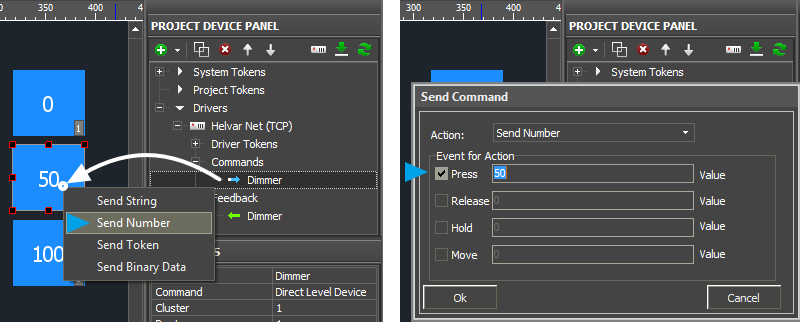
Drag the command from the device tree to Button. Select the Send Number tag in the dialog window:
Select the interface event and the value for sending:
- Press – the command will be sent when pressing on the item.
- Release - the command will be sent when releasing the item.
![]() Values sent by Button should be in the available range. In the Helvar system the range for any device is 0 ~ 100, but the dimmer processes all values and the relay reacts to zero and non-zero value. At that there is no such thing as operating limit and if you will send the value which is less than this limit they relay does not work! The settings are formed when configuring Helvar.
Values sent by Button should be in the available range. In the Helvar system the range for any device is 0 ~ 100, but the dimmer processes all values and the relay reacts to zero and non-zero value. At that there is no such thing as operating limit and if you will send the value which is less than this limit they relay does not work! The settings are formed when configuring Helvar.
Ways of reacting on events:
Button can work without the feedback channel (when controlling a group or when you don’t need the device status in the project). Such Button will change its state to the second (active) one on pressing and will return to the initial state when releasing it. In order to do that indicate Feedback: Momentary in Object Properties: General - react on pressings.
Button can also work with feedback channel. Then it will change its state to the active one if the feedback channel sends any non-zero value. In this case we indicate Feedback: Channel in Object Properties: General – react on the device status. The feedback channel is assigned to Button with the "In Value" tag – react on the item state.
The assigned command and the feedback channel will be displayed in the Programming tab of the Object Properties window. If it is necessary the command can be transferred from the Press event to Release by dragging it by the text field.
Setting up Values by Level, Trigger Button and Up/Down Buttons
Level, Trigger Button, Up/Down Buttons are the graphic item types used for switching several values of the device status. They are set up differently but on the stage of assigning Helvar commands to them they function similarly. That is why they are presented in one section.
Level
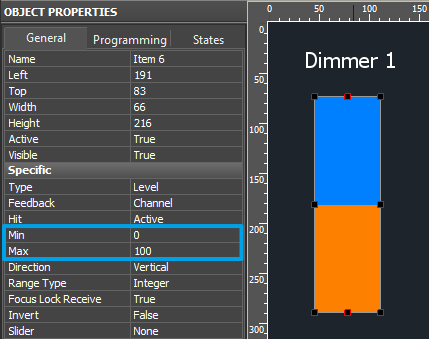
Create a graphic item in Editor Workspace. Select Type: Level in Object Properties: General and indicate the item properties:
In the settings of Level indicate:
- Feedback – way of reacting on events:
Channel – for Level which will monitor the actual variable status,
Momentary – for Level which will NOT display the actual status of the controlled device - Min: 0 – the lowest value of the Level scale
- Max: 100 - the lowest value of the Level scale
The Min...Max range defines the limit of the status regulation. By reducing the range you can create an artificial cutoff (the regulation range is lower than the available one).
- Direction: Vertical/Horizontal – position in space.
Other properties are set if required.
Trigger Button
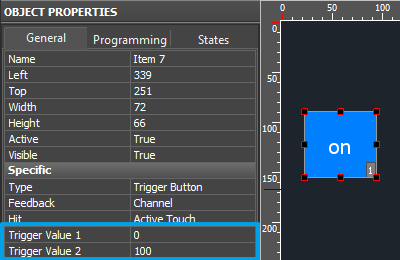
Create a graphic item in Editor Workspace. Select Type: Trigger Button in Object Properties: General and indicate the item properties:
In the settings of Trigger Button indicate:
- Feedback - way of reacting on events. Channel – the item has to process data received from equipment and display them.
- Trigger Value 1 and Trigger Value 2 – values Trigger Button switches at each pressing on it. Each time the item selects the value for sending which is opposite to the current one. Feedback channels are used for defining the current value.
Up/Down Button
Create a graphic item in Editor Workspace. Select Type: Up/Down Button in Object Properties: General and indicate the item properties:
In the settings of Up/Down Button indicate:
- Feedback - way of reacting on events. Channel – the item has to process data received from equipment and display them.
- Up/Down Value – the step of increment/decrement at each pressing ("-10" / "10" – decrement and increment)
- Min/Max Value – limits which cannot be exceeded. For decrementing the lowest limit is indicated, for incrementing – the highest limit (for example, "0" for decrementing "-10" and "100" for incrementing "10").
Assigning commands to graphic items (through the example of Level)
Assign the command to the set up items (Level, Trigger Button or Up/Down Buttons) – it is performed similarly in all cases.
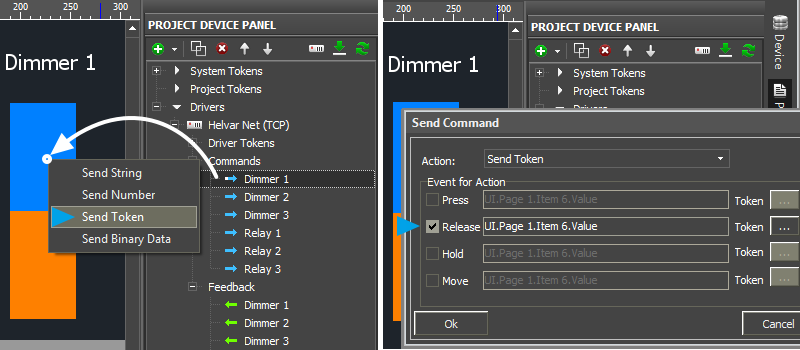
Select the "Send Token" tab in the dialog window. It is ALWAYS used with Levels, Trigger Buttons and Up/Down Buttons. It allows you to send the value corresponding the current position of the Level slider to the device:
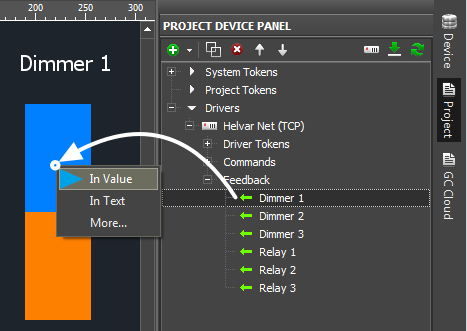
Assign the feedback channel (Feedback) to the item with the "In Value" tag to display the current status of the controlled device – to affect the item state (in this case the slider position):
"Recall Scene (Device/Group)" – Recalling Scenes
Use the "Recall Scene Device / Group" command to recall scenes programmed for a device or group of devices. The command for recalling scenes can be directed to loads only (dimmers, relay modules, etc.):
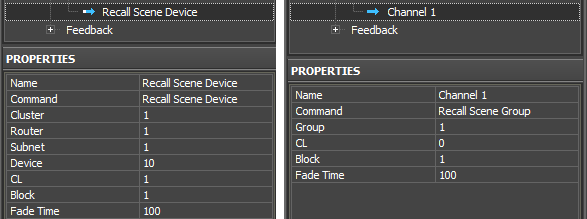
Commands – commands to devices and groups of devices
- Command: Recall Scene Device – recalling the device scene
- Cluster (1..253), Router (1..254), Subnet (1..4), Device (1..255) – the device address (@ address)
or Group (1..16383) – the address of a group of devices in the Helvar system - CL – Constant Light (1 = On, 0 = Off)
- Block (1..8) – the block number. Scene 1.2 – block 1, scene 2 (see Helvar Designer).
- Fade Time (ms) (0..6553.5s) – speed of changing the device status from the current to the preset one after receiving the command of setting up the status.
The number of the scene you need to recall is selected as the "Value" property when dragging the command to the graphic item.
Graphic items used for recalling scenes:
When the command for controlling scenes is set up it is required to assign it to graphic items of the project. Each item can recall its own scene. In order to do that the following graphic items are used:
- Buttons – each item can store the number of the scene it has to activate. When pressing on Button the stored value is sent to the Helvar system.
Recalling scenes by Button
Create Button with 1 or 2 states. With the help of Button you can recall scenes in the Helvar system by number (1, 2, 3, ...).
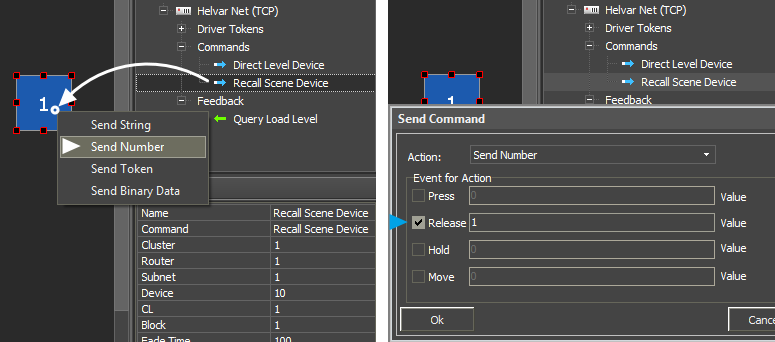
Drag the command from the device tree to Button and select the Send Number tag in the dialog window – send the value:
Select the interface event and value (Value – the scene number), which should be sent to a device or a group of devices in the Helvar system:
- Press – the command is sent when pressing on Button
- Release - the command is sent when releasing on Button
The assigned command will be displayed in the Programming tab of the Object Properties window. If it is necessary the command can be transferred from the Press event to Release by dragging it by the text field.
"Direct Proportion (Device/Group)" – Setting up Proportions
When using "Direct Proportion" the value which will be set up is calculated as the difference between the last taken value (set up by the scene or directly) and its maximum value.
When setting up the proportion positive value it is calculated as the difference between the current value and the maximum level (100%).
For example, if the last recalled scene set up the value for 44% and you activate the "Direct Proportion (Device)" command for proportional increment of the level by 50%, the value will be set for 72%. It is calculated according to the following formula:
44% + (100 - 44)*50% = 72%
When setting up the proportion negative value it will be calculated as the difference between the current value and 0%:
For example, if the last recalled scene set up the value for 44% and you activate the "Direct Proportion (Device)" command for proportional decrement of the level by 50%, the value will be set for 22% (i.е. the value which equals to 50% from 44%):
(44%/100)*50% = 22%
The command of controlling proportions can be used for gradual increment or decrement of the current level value. The value range of the function of the directly proportional value change is from -100 to 100%.
The following commands of setting up proportions also will use the level value set up by scenes or directly (not the last one set up by proportions).
Setting up proportions by Button
Create Button with 1 or 2 states. With the help of Button you can send any value, in our case it is a proportion (1, 5, 10, -10,...).
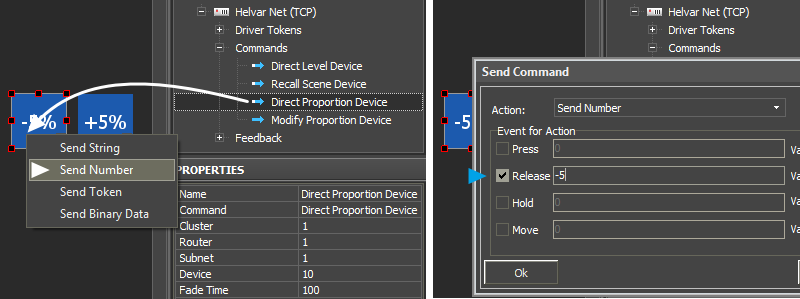
Drag the command from the device tree to Button and select the Send Number tag in the dialog window – send the value:
Commands – commands to devices and groups of devices
- Command: Direct Proportion (Device/Group) – setting up proportions
- Cluster (1..253), Router (1..254), Subnet (1..4), Device (1..255) - the device address (@ address)
or Group (1..16383) – the address of a group of devices in the Helvar system - Fade Time (ms) - speed of changing the device status from the current to the preset one after receiving the command
Select the interface event and value (Value – the proportion value, -100..100), which should be sent to a device or a group of devices in the Helvar system:
- Press – the command is sent when pressing on Button
- Release - the command is sent when releasing on Button
The assigned command will be displayed in the Programming tab of the Object Properties window. If it is necessary the command can be transferred from the Press event to Release by dragging it by the text field.
"Modify Proportion (Device/Group)" – Modifying Proportions
The "Modify Proportion" function uses the same formula as the function of setting up proportions. But the proportion is calculated from the value which was set up by the previous "Direct Proportion" command and not by the value set up by scenes or directly.
For example, let us take the result of applying the "Direct Proportion" command described in the previous section – 72%. When sending the command «modify the proportion by 5%», the level will change from 72% to 75% according to the following formula:
44% + (100 - 44)*(50% + 5%) = 74,8% = 75% (see the initial calculation in the previous section)
According to the formula when sending the negative value the indicated value is deducted from the value set up by the direct proportion. The command «modify the proportion by -5%» will change the variable value from 72% to 69% according to the following formula:
44% + (100 - 44)*(50% - 5%) = 69,2% = 69% (see the initial calculation in the previous section)
This way can be used for correcting values set up by the "Direct Proportion" command.
The value range of the function modifying proportions is from -100 to 100%.
Modifying proportions by Button
Create Button with 1 or 2 states. With the help of Button you can send any value, in our case it is a modification value in the percentage terms from maximum (1, 5, 10, -10,...).
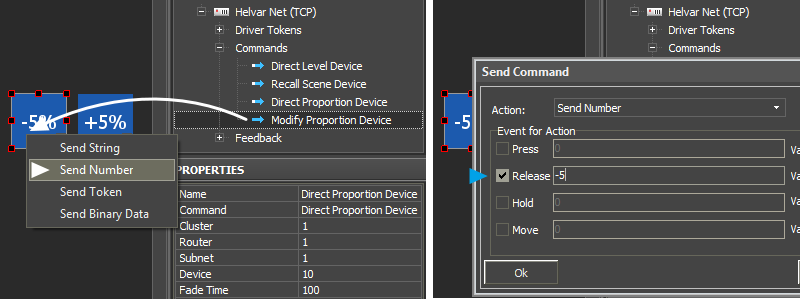
Drag the command from the device tree to Button and select the Send Number tag in the dialog window – send the value:
Commands - commands to devices and groups of devices
- Command: Modify Proportion (Device/Group – modifying proportions
- Cluster (1..253), Router (1..254), Subnet (1..4), Device (1..255) - the device address (@ address)
or Group (1..16383) – the address of a group of devices in the Helvar system - Fade Time (ms) - speed of changing the device status from the current to the preset one after receiving the command
Select the interface event and value (Value – the modification value, -100..100), which should be sent to a device or a group of devices in the Helvar system:
- Press – the command is sent when pressing on Button
- Release - the command is sent when releasing on Button
The assigned command will be displayed in the Programming tab of the Object Properties window. If it is necessary the command can be transferred from the Press event to Release by dragging it by the text field.
Requests and Emergency Tests
The requests for the device status in the Helvar system are formed in the Feedbacks tab of the project device tree.
For periodical request about the state it is required to create the feedback channel which is activated on timer with a certain interval.
When working by the protocol which supports auto-notification about changing the status in the system. The feedback channel is created without timer.
| Request: | Description: |
General Query Commands – general requests: | |
| Query Clusters | all identifiers of items (Cluster Member) in the cluster |
| Query Routers | all identifiers in the indicated cluster |
| LSIB - Last Scene In Block | the last activated scene of the indicated block |
| Query Device Type | the type of the requested device. 1 - DALI, 2 - Digidim, 4 - SDIM, 8 - DMX |
| Query Description (Device/Group) | device/group description |
Device State Query Commands – the device state | |
| Query Device State | device flags (parameters) - list |
| Query Device Is Disabled | disabling the device |
| Query Lamp Failure | lamp failure |
| Query Device Is Missing | missing the device |
| Query Device Is Faulty | device failure |
| Query Emergency Battery Failure | failure of the emergency battery |
Measurement / Input / Level Query Commands – requests about changes: | |
| Query Measurement | changing analog parameter, for example, light (Analogue Input Unit) |
| Query Inputs | state of the digital input |
| Query Load Level | the device status |
Power Consumption Query Commands – power consumption: | |
| Query Power Consumption | power consumption of the device |
| Query Group Power Consumption | power consumption of all devices in the group |
Emergency Test Query Commands – emergency tests: | |
| Query Emergency Function Test Time | time of the emergency test |
| Query Emergency Function Test State | status of the emergency test. Pass - 0, Lamp Failure - 1, Battery Failure - 2, Faulty - 4, Failure - 8, Test Pending - 16, Unknown - 32 |
| Query Emergency Duration Test Time | duration of the emergency test |
| Query Emergency Duration Test State | duration of the emergency state |
| Query Emergency Battery Charge | charge of the emergency battery |
| Query Emergency Battery Time | total working time of the emergency battery |
| Query Emergency Total Lamp Time | total working time of the lamp from any power source |
System Query Commands – system tests: | |
| Query Time, Longitude, Latitude, Time Zone, Daylight Saving Time, Software Version, HelvarNet Version, | system parameters |
Emergency Test Control Commands:
Commands for sending to DALI interfaces only. There will be no response from non-emergency devices:
| Command: | Description: |
| Emergency Function Test (Device/Group) | request about emergency deice functions |
| Emergency Duration Test (Device/Group) | request about duration of the emergency state |
| Stop Emergency Tests (Device/Group) | stop all emergency tests |
Examples of requests on timer:
"Query Load Level" – Requests about the Device State
Query Load Level – the request created in the project device tree as a feedback channel. It requests the status of the controlled device (used for separate devices only) and sends it to the interface. For example, it can send the state of relays and dimmer brightness value.
Feedbacks – feedback channels for requesting and displaying the status of devices
- Command: Query Load Level – requesting the device status
- Cluster (1..253), Router (1..254), Subnet (1..4), Device (1..255) - the device address (@ address)
or Group (1..16383) – the address of a group of devices in the Helvar system - Use Timer: Yes – the request about the device status on timer (HelvarNet does not send the status without requests). If the timer is on, the device status will not be received.
- Timer, ms: XXXX – frequency of requesting the device status in ms (how often it is required to update information about the device state in the project). The less often is the update, the less is the load on the system.
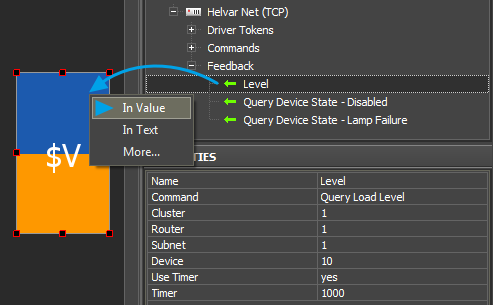
To display the current status of the controlled device assign the feedback channel (Feedback) to the item with the "In Value" tag – affect the item state (in this case - on the slider position).
"Query Device State" –Requesting Device Parameters (Flags)
Each device in the Helvar system of controlling lighting can send information about a number of its parameters (flags) by special requests. This function ca be used when monitoring the state of the lighting system.
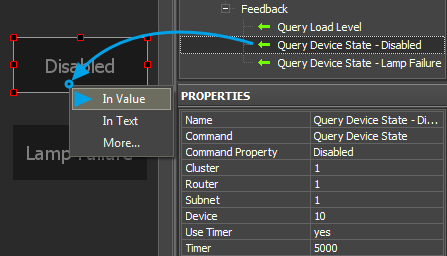
To display device flags create the feedback channel in which settings it is required to indicate the device address and frequency of sending requests to the flag. The channel is assigned to Button which will display the flag status (0 – not active, 1 - active):
Feedbacks – feedback channels for displaying the device status
- Command: Query Device State – requesting and displaying the device parameters (flags)
- Command Property – device flag you need to display
- Cluster (1..253), Router (1..254), Subnet (1..4), Device (1..255) - the device address (@ address)
or Group (1..16383) – the address of a group of devices in the Helvar system - Use Timer: Yes - the request about the device status on timer (HelvarNet does not send the status without requests). If the timer is on, the device status will not be received.
- Timer, ms: XXXX - frequency of requesting the device status in ms (how often it is required to update information about the device state in the project). The less often is the update, the less is the load on the system.
List of flags for "Query Device State":
| Command Property | Description |
| Disabled | Device or subdevice has been disabled, usually an IR subdevice or a DMX channel |
| Lamp Failure | Unspecified lamp problem |
| Missing | The device previously existed but is not currently present |
| Faulty | Ran out of addresses (DALI subnet) / unknown Digidim control device / DALI load that keeps responding with multi-replies |
| Refreshing | DALI subnet, DALI load or Digidim control device is being discovered |
| Resting | Load is intentionally off whilst the control gear is being powered by the emergency supply |
| Reserved | |
| In Emergency | No mains power is being supplied |
| In Prolong | Mains has been restored but device is still using the emergency supply |
| FT In Progress | The Functional Test is in progress (brief test where the control gear is being powered by the emergency supply) |
| DT In Progress | The Duration Test is in progress. This test involves operating the control gear using the battery until the battery is completely discharged. The duration that the control gear was operational for is recorded, and then the battery recharges itself from the mains supply |
| DT Pending | The Duration Test has been requested but has not yet commenced. The test can be delayed if the battery is not fully charged |
| FT Pending | The Functional Test has been requested but has not yet commenced. The test can be delayed if there is not enough charge in the battery |
| Battery Fail | Battery has failed |
| In Hi Bit | Prevents an emergency fitting from going into emergency mode |
| FT Requested | Emergency Function Test has been requested |
| DT Requested | Emergency Duration Test has been requested |
| Unknown | Initial state of an emergency fitting |
| Over Temperature | Load is over temperature/heating |
| Over Current | Too much current is being drawn by the load |
| Comms Error | Communications error |
| Severe Error | Indicates that a load is either over temperature or drawing too much current, or both |
| Bad Reply | Indicates that a reply to a query was malformed |
| Device Mismatch | The actual load type does not match the expected type |
