Examples of Clipsal Control: Lighting
Contents
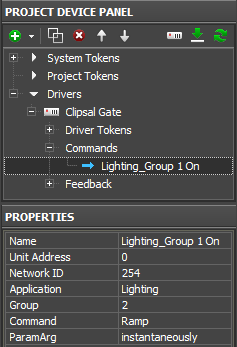
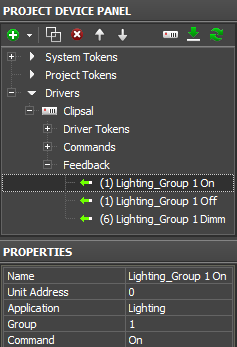
After project import to GUI Editor a separate command will be created for each group address. By default, for the Lighting application it will look as follows:
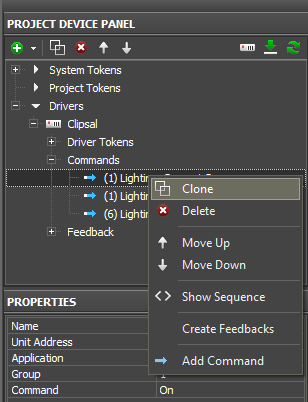
To control the group address it is required to create a command for each control action (for example, to turn on - Command_On, to turn off - Command_Off and to dim- Command Ramp = 3 commands). It is more convenient to do it by cloning the command in Project Device Panel:
                            In the examples the Clipsal driver is used.
                To use the Clipsal Gate driver use this instruction.
Control of Group Addresses
Setting up Values by Button
Button is a graphic item with 1 or 2 states. It can be used both for sending values to controlled equipment and for displaying data received from the equipment.
Variants of using Button for control:
- Turning on;
- Turning off;
- Setting up a particular value – the range for any device is from 0 to 255.
Activate the group address (Command - On)
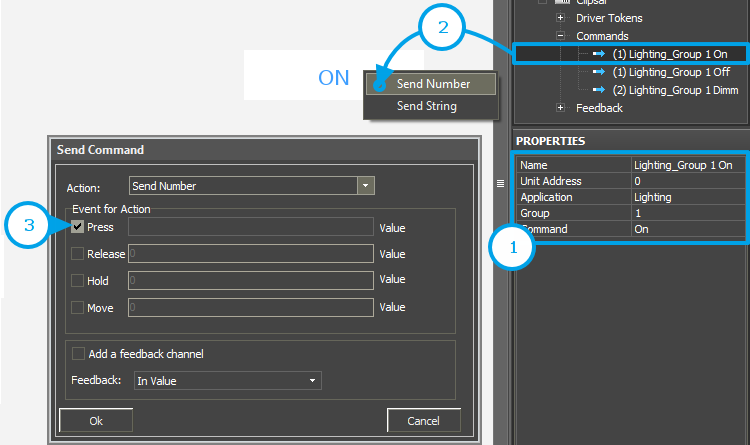
1. Set up the command for turning on. In order to do that it is required to select Command: On in the command properties.
2. Assign the command to the graphic item. Select the "Send Number" tag in the dialog window.
3. Select the event and value for sending. It is done depending on the required Button behavior.
- Press – the command is sent when pressing on the item
- Release - the command is sent when releasing the item
Do NOT write anything in the edited field (the field should be empty).
Ways of reacting on events:
Button can work without the feedback channel (when controlling the group or when you do not need to receive the status of the device in the project). Such Button changes its state to the active one at pressing and returns to the initial state at releasing. In order to do that, indicate Feedback: Momentary – react on pressings – in the item settings (Object Properties: General).
Button can work with the feedback channel. It changes its state to the active one if the feedback channel sends any non-zero value. In this case in the item settings (Object Properties: General) indicate Feedback: Channel – react on the device status. The feedback channel is assigned to Button with the "In Value" tag – affect the item state.
The assigned command and feedback channel are displayed in the Programming tab of the Object Properties window. If it is required you can drag the command from the Press event to Release.
4. Press on OK.
Deactivate the group address (Command - Off)
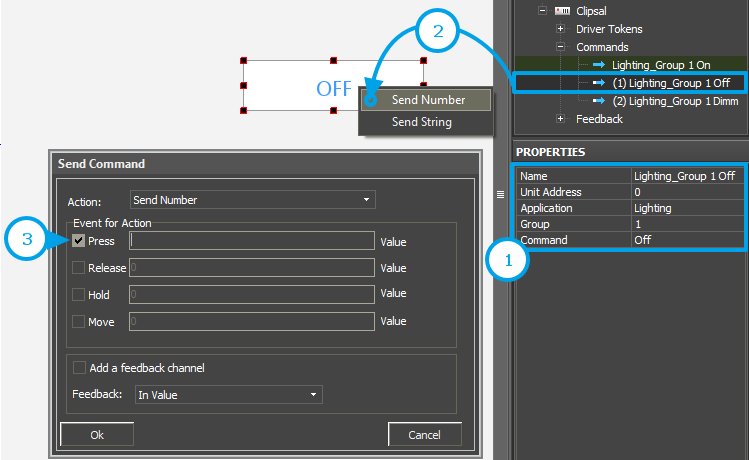
1. Set up the command for turning off. In order to do that it is required to select Command: Off in the command properties.
2. Assign the command to the graphic item. Select the "Send Number" tag in the dialog window.
3. Select the event and value for sending. It is done depending on the required Button behavior.
- Press – the command is sent when pressing on the item
- Release - the command is sent when releasing the item
Do NOT write anything in the edited field (the field should be empty).
Ways of reacting on events:
Button can work without the feedback channel (when controlling the group or when you do not need to receive the status of the device in the project). Such Button changes its state to the active one at pressing and returns to the initial state at releasing. In order to do that, indicate Feedback: Momentary – react on pressings – in the item settings (Object Properties: General).
Button can work with the feedback channel. It changes its state to the active one if the feedback channel sends any non-zero value. In this case in the item settings (Object Properties: General) indicate Feedback: Channel – react on the device status. The feedback channel is assigned to Button with the "In Value" tag – affect the item state.
The assigned command and feedback channel are displayed in the Programming tab of the Object Properties window. If it is required you can drag the command from the Press event to Release.
4. Press on OK.
Set up a particular value (Command - Ramp)
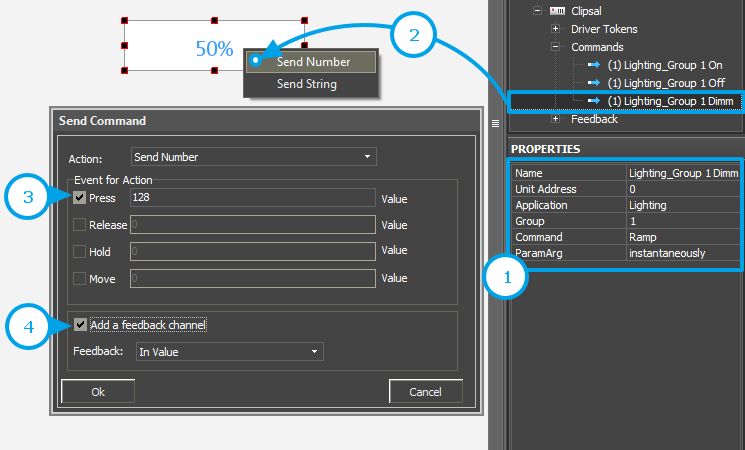
1. Set up the command for setting up the value. In order to do that it is required to select Command: Ramp in the command properties.
2. Assign the command to the graphic item. Select the "Send Number" tag in the dialog window.
Values for sending from Button should belong to the available range. For Clipsal it is 0 ~ 255. If you want to set up 50%, you should indicate 128.
3. Select the event and value for sending. It is done depending on the required Button behavior.
- Press – the command is sent when pressing on the item
- Release - the command is sent when releasing the item
Ways of reacting on events:
Button can work without the feedback channel (when controlling the group or when you do not need to receive the status of the device in the project). Such Button changes its state to the active one at pressing and returns to the initial state at releasing. In order to do that, indicate Feedback: Momentary – react on pressings – in the item settings (Object Properties: General).
Button can work with the feedback channel. It changes its state to the active one if the feedback channel sends any non-zero value. In this case in the item settings (Object Properties: General) indicate Feedback: Channel – react on the device status. The feedback channel is assigned to Button with the "In Value" tag – affect the item state.
The assigned command and feedback channel are displayed in the Programming tab of the Object Properties window. If it is required you can drag the command from the Press event to Release.
4. Press on OK.
Trigger Switching
Trigger Button is used for switching two selected values of the variable.
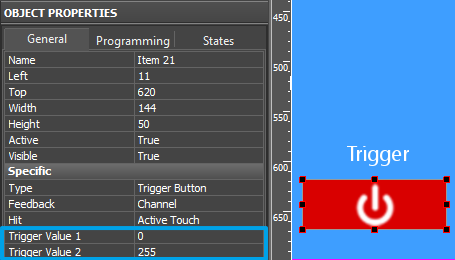
Create a graphic item in Editor Workspace. Select Type: Trigger Button in the settings (Object Properties: General) and indicate its other properties:
In the Trigger Button settings indicate:
- Feedback - the way of reacting on events. Channel - the item should process data received from the equipment and display them.
- Trigger Value 1 и Trigger Value 2 - values the item switches at each pressing (for Clipsal they are 0 and 255). Every time the item selects the value opposite to the current one for sending. The feedback channel is used for receiving the current value.
Set up Trigger button following the steps:
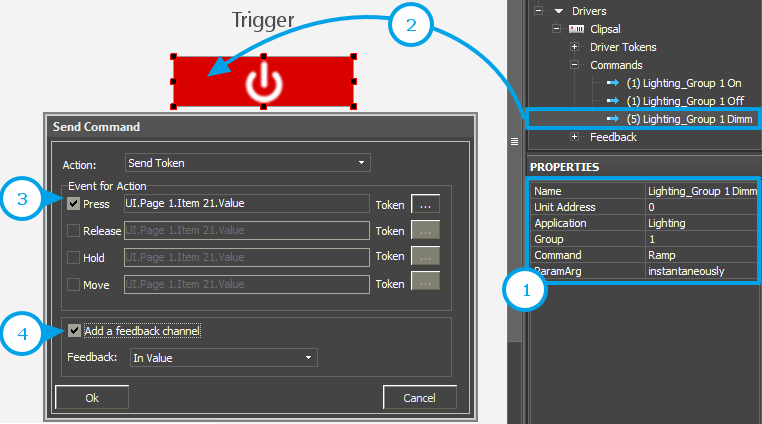
1. Set up the command for Trigger Button. In order to do that it is required to select Command: Ramp in the command properties.
2. Assign the command to the graphic item.
3. Select the event and value for sending. It is done depending on the required Trigger Button behavior.
- Press – the command is sent when pressing on the item
- Release - the command is sent when releasing the item
4. Activate "Add a Feedback Channel". It is required for automatic assigning of the feedback channel to the item. The feedback channel will have the same name as the command. Trigger Button will NOT work without the feedback channel!
Dimming by Level
Level is a graphic item used for setting and displaying values in the preset range. Level has 2 states – filled and empty which partially or fully substitute each other depending on the value taken by Level.
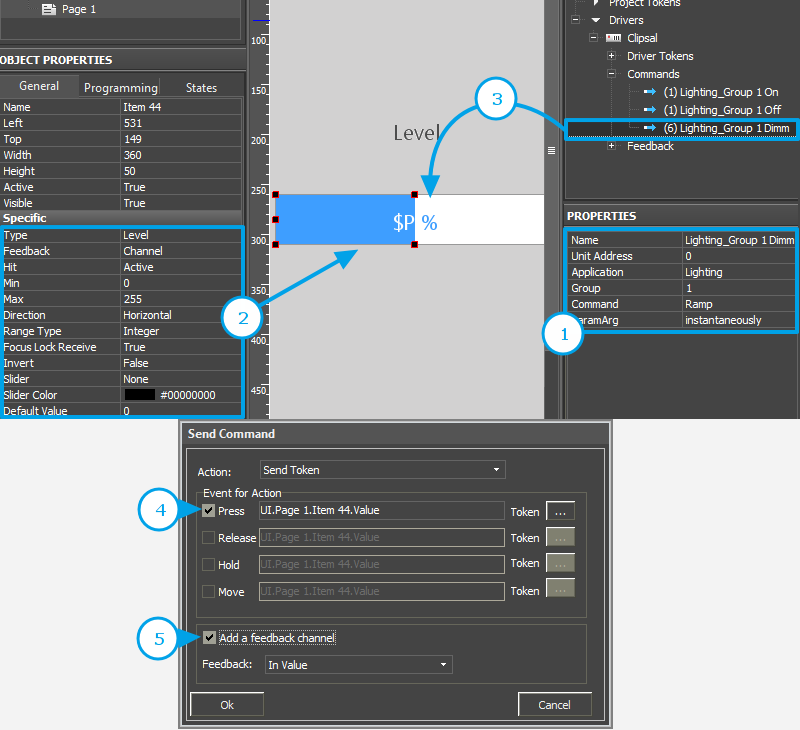
Create and set up a graphic item for controlling the controller variable. Then assign the command to the graphic item following these steps:
1. Set up the command for dimming. In order to do that it is required to select Command: Ramp in the command properties.
2. Set up the graphic item. You can do it in the tab Object Properties: General.
Select Type: Level and set up the item:
- Feedback - the way of reacting on events:
- Channel – for Level which will monitor the actual variable status
- Momentary - for Level which will NOT display the actual variable status
- Min: 0 – the lowest value of the Level scale
- Max: 255 - the highest value of the Level scale
- The Min...Max range defines the limits of regulation. By reducing the limits you can create a cutoff (the regulation range which is less than the available one).
- Direction: Vertical/Horizontal - the item position
Other properties should be set if it is required.
3. Assign the command to the graphic item using drag-n-drop.
4. Select the event of command sending. It can be done at random, but it is better to use the combination of Press and Release (the first is sent when touching Level, the second – when releasing it). The Move event will send values with the moving slider; but it can overload the controller (use with caution).
5. Activate "Add a Feedback Channel". It is required to assign the feedback channel with the same name as command automatically. If you want to assign the feedback channel later use the "In Value" tag to affect the position of the Level slider.
Increment/Decrement
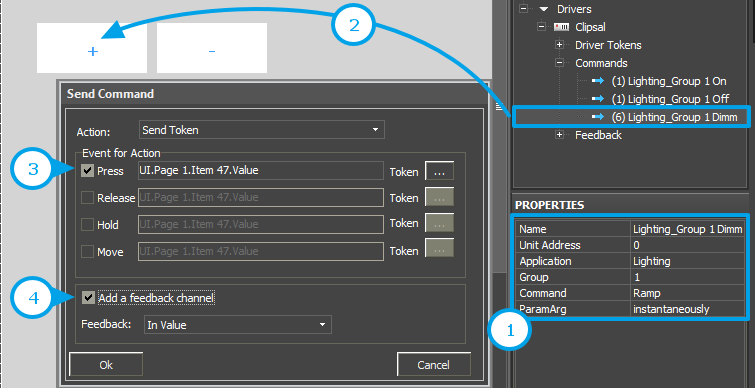
It is convenient to use Up/Down Button for accurate regulation (for example, +\- 1°C). Set them up in the iRidium project:
Indicate the following in the settings of Up/Down Button:
- Feedback - the way of reacting on events:
- Momentary - the item should react on pressings (this feedback type is recommended)
- Up/Down Value - the step of increment/decrement at each pressing ("-10" / "10" – decrement or increment)
- Min/Max Value - limits which cannot be exceeded. For decrementing indicate the lowest regulation value, for incrementing – the highest (for example, "0" for the decrementing step "-10", and "255" for incrementing step "10").
Assignment of the command and feedback channel is performed as for Level. The items will not work correctly without the feedback channel.
1. Set up the command for incrementing/decrementing. In order to do that it is required to select Command: Ramp in the command properties.
2. Assign the command to the graphic item using drag-n-drop. 3. Select the event of command sending: Press or Release.
4. Activate "Add a Feedback Channel". It is required to assign the feedback channel with the same name as command automatically. If you want to assign the feedback channel later use the "In Value" tag to affect the position of the Level slider.
Displaying the Group Address Status
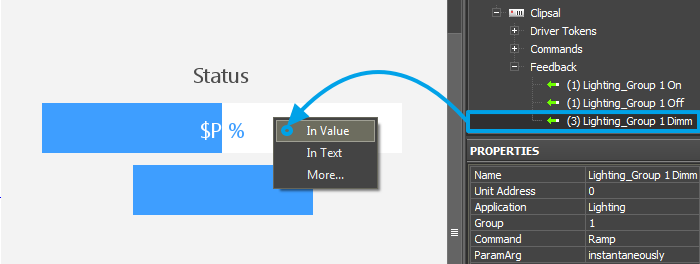
The current state of the controller variable can be output on the selected item of the graphic interface. It is convenient to use Buttons, Levels, Display Buttons (Buttons with 1 state).
The feedback channel can be assigned to the graphic item with the "In Text" or "In Value" tag depending on what graphic item property the value from the channel will affect:
- In Value – the value received from the feedback channel. It will change the graphic item state switching it from the non-active to active or moving the Level slider. «Templates of value output on items» (see below) are also used at work.
- In Text – the value received from the feedback channel will substitute any text which was written in the graphic item text field by default.
- More... – here you can select any graphic item property the value from the channel should affect, for example, opacity, activity or X and Y coordinates.
Templates of processing and outputting data for feedback channels:
Template |
Function |
Template |
Function |
$P |
Output of the current level value in percentage | $V |
Output of the current value |
$L |
Output of the lower level value | $H |
Output of the upper level value |
$S |
Output of the current state number | $A |
Output of the current value minus the lower level value |
$R |
Output of the level range (Upper level value minus lower level value) | $F1-5 |
Output of the value with a floating point, number of symbols after a point |
$X |
Output of the current value in the hex type | $$ |
Output of the "dollar" symbol |
A command (template) of incoming data processing and displaying is entered into the text field of a graphic item and can be combined with other text or symbols (comments, units of measurement)
