Solving Problems with Project Upload and Panel Search
Contents
There is a number of typical problems which can lead to the disfunction of the panel search in iRidium Transfer or disable project uploading on control panels. Even when your application is set up correctly you can face the situation when you need to check some settings of PC, network and safety.
You can face all problems described here in practice. Please check all the solutions provided here before contacting iRidium technical support team!
Stages of Searching Panels and Uploading Projects. How to Understand that You Have Problems
Steps of standard work with Transfer and solutions for possible problems:
1. Install iRidium Environment on your PC and i2 Control on iOS/Windows/Android/OS X
- If you have problems with download make sure you registered on the web site and log into your account.
2. Launch iRidium Transfer on your PC
- If you cannot launch the application delete the iRidium Mobile folder from the Windows register (the regedit command) and install iRidium Environment again.
3. Launch the i2 Control application on iOS/Windows/Android/OS X. Make sure the application is opened and the panel doesn’t go to the "sleep" mode. It is required for the next step.
4. Click "Search" in the Panels tab of the Transfer application on your PC. It activates the search of control panels in the local network. It lasts for about 10 seconds. Make sure i2 Control is launched and opened at this time.
5. Panels with i2 Control will appear in the Transfer list during the search. Their indicator will be green.
- If the panel you need does not appear, follow instructions for solving problems below
- If the indicator is yellow and not green, see "Indication of the Panel State in Transfer" below
6. Add your iRidium project (*.irpz or *.TP4) and the iRidium license file (*.irl) in Transfer. You can see how it is done here.
- If Drag&Drop doesn’t work when you want to add a project or a license, use the Administrator account on your PC or "Add project" and "Add license" buttons.
7. In the Panels tab indicate what project and license should be uploaded on i2 Control.
- If you cannot select the license file for your panel, it means it is not valid any more (Trial) or it is the license for another device. Check it in your MY ACCOUNT section.
8. Click "Reload" in Transfer. It will activate upload of the project and license on the panel. At that iRidium should be opened on iOS/Windows/Android/OS X and PC.
- If nothing happened, see the instructions for solving problems below
- If i2 Control uploaded but the project was not updated, see instructions for solving problems below
- If everything worked before and now the indicator is red, then repeat Search and follow instructions for solving problems below
- If the upload completed but the app crashes, most likely it is the problem with the project. Contact iRidium Support Team
Normal upload looks as follows:
- in Transfer: the string of beginning and finishing the upload is written in the log, the progress bar Downloading is moving on the panel
- in i2 Control: progress bars Download > Unpack > Loading run one after another, after that you see the project in the application window.
If something goes wrong, refer to the instructions for solving problems below.
Indication of the Panel State in Transfer
Indicator in Transfer shows the panel status:
- the panel is not connected (red)
- the panel is connected (green)
- the updated is off (yellow)
In order for the update to work, the indicator of the panel status in Transfer should be green (On). It shows that the application is launched and opened:
Indicators of the panel status in Transfer:
How to turn the project update on the panel on/off:
If the panel indicator is yellow, you cannot upload a new project on the panel. To change the panel status to green use the i2 Control system menu:
To open the system menu:
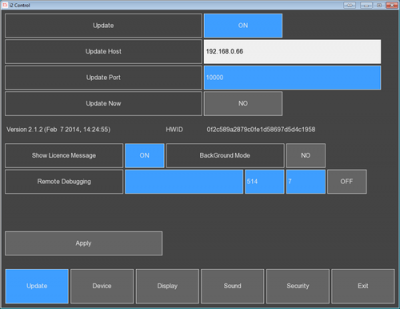
Launch iRidium Transfer on your PC and i2 Control on the control panel. Right click on the panel in Transfer and select "Show System Menu" – application settings will open:
Update properties in the system settings:
- Update (Yes/No) - SELECT (YES) to be able to update the project
- Update Host – the IP-address of the computer with iRidium Transfer.
- Update Port – the ТСР port through which the project update is performed (10000 by default).
If you need to change the port, you should also change it in the Transfer settings (after changing the port restart the application). - Update Now (Yes/No) – the command of the forced update (without using the Reload button in Transfer).
To confirm the forced update click on the Apply button after selecting Update Now: Yes. - Apply – the button for confirming actions which change the settings of iRidium App. Click Apply after changing the application settings. Otherwize the changes will not be saved.
After the upload of the final project version deactivate the update to fasten the application
launch (select "No" in the "Update" check box in the iRidium App settings).
How to Fix Problems with Panel Search and Project Uploading
Please perform all actions below one by one. They will help you to find and fix the problem:
Correspondence of versions
iRidium versions on PC and your control panel have to correspond:
- with iRidium V1.5 you need to use the iRidiumHD application
- with iRidium V2.1 you need to use the i2 Control application
- with iRidium V2.2 you need to use the i2 Control V2.2 application
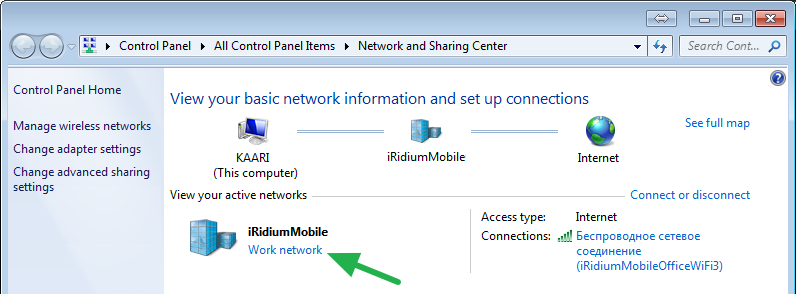
1. Home or office Wi-Fi network
If your PC is connected to Wi-Fi for Transfer to work, make sure this network is not "Public", as search and upload won’t work in this mode.
1. Transfer Network Connections
Only ONE network connection should be selected in the Transfer settings :
After you selected one of the available network connections, confirm the changes and restart Transfer.
3. Windows Firewall
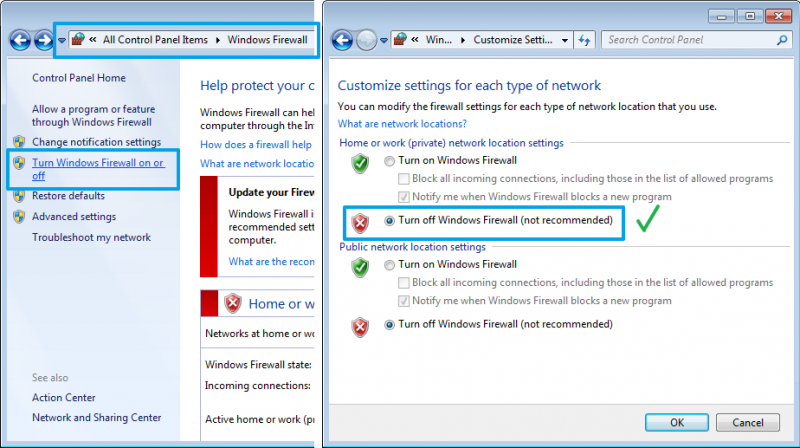
Turn off Windows Firewall. It is the most common reason of problems with project upload.
The distinctive feature of the problem is that the Firewall does not show messages about blocking the Transfer application. The problem can appear after you reinstall Transfer, restart your PC or change your Wi-Fi network even if there were no problems before.
Start > Control Panel > Windows Firewall >Turn Windows Firewall On or Off > Turn Firewall Off.
If it helped add iRidium Transfer in the list of exceptions of Firewall (or temporarily turn it off).
4. Anti-virus Software
Turn off any antivirus software (for example, AVAST, ESET, Kaspersky, Dr.WEB, Microsoft, Panda, Agnitum, etc.) temporarily! It is important to turn off anti-virus network and file screens. If you are sure that you will do it correctly just add iRidium Transfer in the list of exceptions of your anti-virus software.
After turning the anti-virus software off restart Transfer. If it helped add iRidium Transfer in the list of exceptions of your anti-virus software (or temporarily turn it off).
5. Connection Between Devices
The project might not upload on the control panel because of incorrect settings of the IP-network.
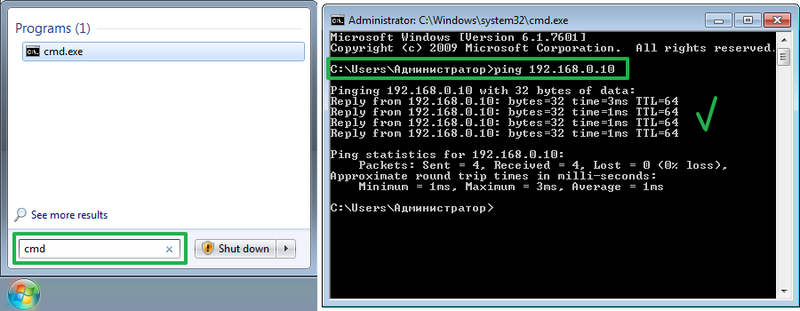
For example, on one of the devices Wi-Fi can be off or the devices might be in different IP-subnetworks. To check it, ping the control panel with the PC where Transfer is running:
Start > Run > cmd > ping [IP of the panel] >>>ping 192.168.0.10
Check network settings on all devices: their addresses should belong to one network and subnetwork:
If the IP-address of your PC is 192.168.1.XХ, then the panel IP-address should be 192.168.1.YY
If there are problems with network connection please contact your local network administrator.
6. Third-party Software (Torrent-tracker)
The Transfer application uses ТСР port 10000 and UDP ports 10001, 10002 for searching panels and uploading projects. Some applications, for example uTorrent, also use these ports and thus block the work of Transfer.
If the port of project uploading (10000) is busy, you will see the message in Transfer. Do not ignore it! Turn off the third-party applications which show network activity and restart Transfer.
7. Selecting Projects in Transfer
Make sure you added your project and license in Transfer, and not only upload the standard interface (default screen saver) which is stored in Transfer by default.
When making any changes in your project you need to update the project in Transfer manually for these changes to be uploaded on the control panel.
8. Correct Wi-Fi settings on all devices
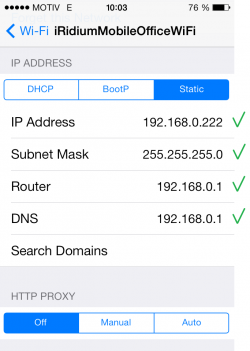
If you use the static address of PC and the panel, make sure all required fields of connection settings are filled in (especially the router address). Otherwise, you will have ping but Search will not work.
- The device IP-address should be unique in one IP subnetwork
- The router have to be indicated and it should be done correctly. Otherwise, the client will not be able to connect to Transfer for project uploading.
- DNS should be indicated if you work via the Internet.
If you use 'DHCP' on iOS click "Renew Lease"
9. HTC, Samsung note 3 (Android OS)
Due to security settings on some HTC smartphones (HTC Sensation, HTC Incredible S) the panel search function and update from Transfer do not work.
In the case of such problem you should update your project through iRidium App system settings. See more information about it in “What to Do if You Couldn’t Fix the Problem”.
What to Do if You Couldn’t Fix the Problem
Use these instructions if you need to solve the problems urgently. In other cases please contact iRidium Support Team to find out the reasons of problems with panel search or project upload.
You can initiate project upload manually. Indicator of the panel in Transfer will be red but in some cases the project upload becomes possible.
1. Start iRidum App on the control panel (i2 Control, i2 Next).
2. Hold a finger on any area of the application without active items (for example, in the left upper corner) for 10 seconds.
3. You will see the password request. Enter 2007 and click "ОК"
4. Now you are in the iRidum App system settings. The "Update" tag on the first page of the settings should be "ON" (update is on).
5. In the field below, in the "Host" property indicate the IP-address of the computer where iRidium Transfer is running.
6. Activate the "Update Now: YES" option.
Click "Apply", then on "Exit". You will leave the system settings.
7. Click "Apply". The application will be automatically restarted.
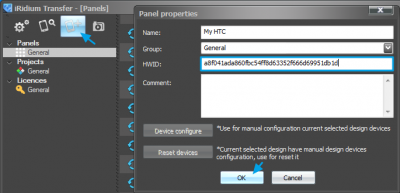
8. In the Transfer log (if Search didn’t work and the panel was not added to Transfer) you will see the message "Authorization is false" (the device is not in the list). The device HWID will be shown in the line before the message:

9. Copy the HWID and add it in the list of panels using the "Add Panel" button:
10. Close iRidum App on the panel. The application should NOT be in the background
11. Assign the project and license to the added panel and restart iRidum App. It should start upload of the project and license on the panel.
At that, if Search didn’t work, it will not work but you will be able to upload your projects by restarting iRidum App on the panel.
Please go through all the above mentioned solutions. If after performing all of the actions above you still have problems with uploading your project on the control panel, contact iRidium Support Team: support@iridiummobile.zendesk.com


