Setting up SIP Telephony in iRidium
You can set up communication between iRidium panels, between IP phones or IP Intercom in your flat, house or office via SIP (PBX IP-АТС) servers.
SIP server – it can be hardware (IP-АТС) or software installed on PC. The server function: establishing connection between subscribers.
SIP subscriber – it is iRidium on a smart phone, tablet or PC, an IP phone or video intercom. The subscribers can call each other only via the server.
Setting up SIP Servers
iRidium can work with a wide range of hardware and software PBX servers. You can see the list of servers which are already tested for work with iRidium in the description of capabilities in iRidium.
Настройка SIP сервера:
Supported SIP audio codecs:
- PCMU (M-Law)
- PCMA (A-Law)
- GSM
Working with the iRidium SoftPhone Interface for SIP
1. Download the interface iRidium SoftPhone in the Downloads section.
2. Open it in iRidium GUI Editor from iRidium Environment.
3. Set up properties for connection to the SIP server.
4. Save the changes and click on "Send to Transfer" button.
5. In Transfer assign the project to the iRidium panel where you want the SIP client to work.
6. Get the iRidium license file (for example, Trial) and assign it to the panel.
7. Upload the project on the control panel.
8. The project will be launched on the panel. The connection status On Hook... tells about the successful connection to the server.
9. You can change the properties of connection to the server in the Accounts window.
10. In the Camera window you can set up displaying of stream video from you video Intercom or any IP camera. Setting up of the cameras is performed in iRidium GUI Editor.
11*. If you need to add the SIP module in your iRidium project, merge the iRidium SIP module with your project
After the server is connected, the exchange of audio data between the subscribers is performed directly (although another variant is possible – voice transfer via the server, when the recording is made). Voice transfer is performed via RTP ports.
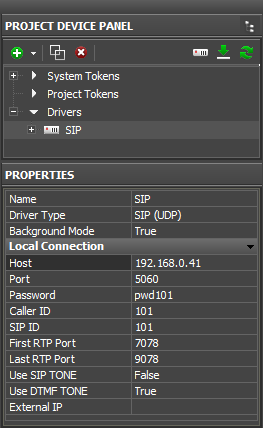
Indicate the data of one of the subscribers to set up the SIP driver:
- Name - the driver name. Do NOT change it in the ready-made iRidium module!
- Driver Type – information about the driver type
- Background Mode - for iOS devices. When the Background Mode is activated the driver can display notifications even if the application is minimized (working time in the background mode is limited).
- Host – the IP-address of the PBX server in the local network or the Internet
- Port – the port of connection to the PBX server (usually it is 5060 or 5061)
- Password – the password of connection to the server (for the selected account)
- Caller (ID) Name – the subscriber’s name (for example: User)
- SIP ID – the subscriber’s identifier (it can be called Caller ID, for example: 102)
- First RTP Port – the beginning of the RTP port range for connection to the server
- Last RTP Port – the end of the RTP port range for connection to the server
- Use SIP TONE – to generate SIP messages in the tone mode
- USE DTMF TONE – to generate messages in the tone mode
- Extrenal IP – indicate your (control panel) IP-address if you indicated the external address of the remote SIP server in the Host field. To work via 3G/4G – via the dynamic IP-address – it is required to find the external address of the control panel automatically. There is an additional script for that. It can be downloaded and launched in your project.
Setting up connection to the remote SIP server via the Internet
Description of SIP Driver Commands and Messages
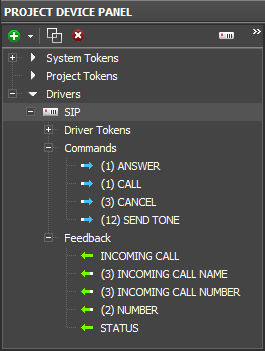
Description of SIP driver commands and events (if you would like to use the driver without the ready-made graphic interface or to edit it):
Commands:
- ANSWER – to answer an ingoing call (Send Number: 0)
- CALL – to make a call (Send Number: 0). The number is taken from Feedbacks > NUMBER, where it should be written in advance.
- CANCEL – to cancel a call (Send Number: 0)
- SEND TONE - to send a tone value (Send Number: 1-9, * = 10, # = 11)
Feedbacks:
- NUMBER – the subscriber’s number for an outgoing call. The number can be written in Feedback via the dialog Send Number to Project Token in the macros editor of the button or Editbox.
- INCOMING CALL – if there is an incoming call (0 or 1)
- INCOMING CALL NAME – the caller’s name (text)
- INCOMING CALL NUMBER – the caller’s number (text)
- STATUS – the current connection status (text). Possible status:
- On Hook...- connected to the SIP server, ready for work
- Connected...- made a connection, getting ready to register
- Disconnected...- forced disconnection from the server (by the command to the driver)
- Failed...- an error at connection (unrelated to the SIP server)
- Trying...- a call request is being processed
- Ringing...- the location of the user being called is determined. The signal about the incoming call is sent.
- Incoming Call...
- Talking...
- Not Found...- the subscriber being called is not found, there is no such SIP number
- Not Acceptable...- the connection with the server is established but some parameters, such as the type of requested information, bandwidth and addressing type are not available
- Not Available...- the subscriber being called is not available for calls
- Declined...- the subscriber being called does not want to take calls, without indicating the reason
- Request Pending...- the request is received when the server hasn’t finished processing the other request for this dialog
- Service Unavailable...- the server cannot process the call at the moment because of the overload or maintenance


