AMX. Switching Between Wi-Fi and 3G
iRidium panels can connect to the АМХ controller in the local network or via the Internet. For switching between Wi-Fi (local network) and 3G (Internet, remote connection) it is required to create buttons which will initiate change of the connection settings. At that two variants are possible:
- 1. If the project is created in TPDesign4, then for changing the connection settings you should use the command which is formed in TPDesign4 (Button Command Output) or can be sent to iRidium panels from the АМХ controller:
- Syntax of the command for switching properties in TPDesign4:
IR_PARAMETERS-<host>,<port>,<login>,<password>,<panel_id>
- 2. If the project is created in iRidium GUI Editor then for changing the connection settings you can use the iRidium Script command which is formed in the Script Editor tab of iRidium GUI Editor.
- Syntax of the command for switching properties in iRidium GUI Editor:
IR.GetDevice("AMX").SetParameters({Host: "<host>", Port: "<port>", DeviceID: "<panel_id>",
Login: "<login>", Password: "<password>"});
Example of Implementing for TPDesign4
If the control panel should hold the connection with the system when the panel is out of the limits of the Wi-Fi network of the system, you need to set up the switch between the Internet and the local network.
The remote mode suggests connection to the system via the Internet. At that the external IP-address or the domain name of the system to which you need to connect have to be used.
 In iRidium Wi-Fi/3G CANNOT be switched automatically. For switching between the Internet and the local network you need buttons with special settings. See the settings below.
 To control the system remotely you have to open the system for external access -
to set up the Port Forwarding Service.
 To secure equipment from unauthorized access we recommend using secure connection with the remote system (VPN).
Setting up of the switch Wi-Fi/3G in iRidium projects:
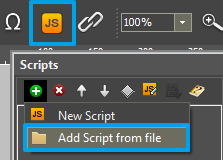
1. Open the script editor in iRidium GUI Editor.
2. Download and add into your project the template of the Wi-Fi/3G switch (Add Script from file):
download the template of the Wi-Fi/3G switch
The Wi-Fi/3G switch is performed with the help of the script function SetParameters
Setting up of parameters of the Wi-Fi/3G switch:
- function Internal_1() // Function name
- {
- IR.GetDevice('AMX').SetParameters({Host: "192.168.0.100", Port: "1319", DeviceID: "10001", Login: "Admin", Password: "Admin"); // Driver Name + Parameters
- }
- function External_1()
- {
- IR.GetDevice('AMX').SetParameters({Host: "215.115.10.10", Port: "1319", DeviceID: "10001", Login: "Admin", Password: "Admin"});
- }
Indicate in the command settings:
- Function name – the name of the switch function (command). Two functions cannot have the same name in a project.
- Driver Name – the name of the driver which parameters are changed
- Parameters – the set of the switch parameters which you need to apply to the driver
Assign commands to buttons:
- Select the button which will be responsible for the Wi-Fi/3G switch.
Open the properties of the button: Object Properties > Programming - Open Macros Editor of the button for the Press or Release events
- Select the Script Call command and add it by double-clicking on it
- Select the name of the function you want to activate in the drop-down list. Create the command.
Set up access to the equipment from the Internet:
In order to do that open the equipment ports for remote access.

