AV & Custom Systems: Control via IR through Global Cache
<< back (AV & Custom Systems: Control via IR channels)
Contents
If it is necessary to control AV equipment or other systems in the installation via IR channels, you are required to use format converter from TCP to IR. We recommend using equipment of the Global Cache company.
Principles of Controlling Equipment via IR
To control Smart Home systems via IR channels iRidium uses the freely customizable "AV & Custom Systems" driver and format converter which enables you to convert the command send via TCP by iRidium to the IR format. Thus the scheme of communication between an iRidium control panel and controlled equipment looks as follows:
Using Global Cache Database (The Base of Ready IR Commands)
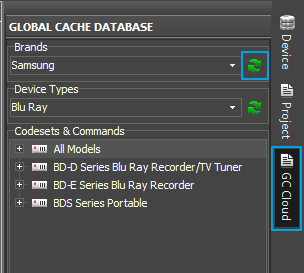
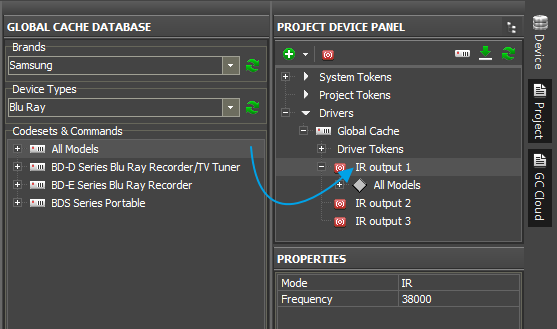
The side panel Global Cache DataBase of iRidium GUI Editor gives access to the base of IR commands provided by Global Cache for using it when working with Global Cache converters (GC-100, iTach):
The search of IR commands can be performed in two fields:
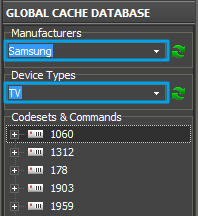
Manufacturers
of equipment, for example Samsung
Device Types,
for example TV
There are buttons for forced update of the IR command base near these fields (it’s an on-line base which is constantly updated).
Codesets&Commands
After finishing the search in the base you will receive the list of IR command sets (Codesets) which are used for controlling equipment of the selected manufacturer and type.
Using Sets of IR Commands from GC Database
To use the found IR commands create a new iRidium project (Ctrl + N).
Selection of the database for using with Global Cache equipment:
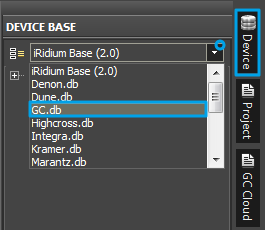
iRidium provides a big number of preconfigured modules for controlling various automation equipment. iRidium Environment includes the Global Cache device base which will allow you to set up equipment control via IR:
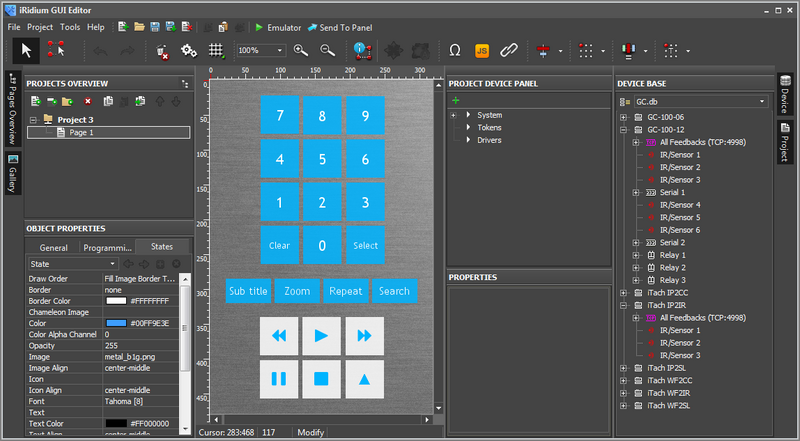
Go to the Device Base panel and select the Global Cache.db (GC.db) database which contains the base of script drivers for Global Cache devices.
Adding ready Global Cache modules in the project tree:
To convert data received from iRidium control panels Global Cache TCP to IR converters are used. A converter is a basic element for transferring data to the device controlled by IR. Global Cache has the following models of converters from IP to IR:
- iTach IP2IR (converter from ТСР to IR with Ethernet output)
- iTach WF2IR (converter from ТСР to IR with the Wi-Fi module)
- GC-100-06, GC-100-12 (converters from ТСР to IR with several IR emitters, additional modules and Ethernet. GC-100-06, GC-100-12 (GC-100-18) do not support concurrent connection of several control panels!)
All of the above devices can be found in the iRidium database as ready preconfigured modules.
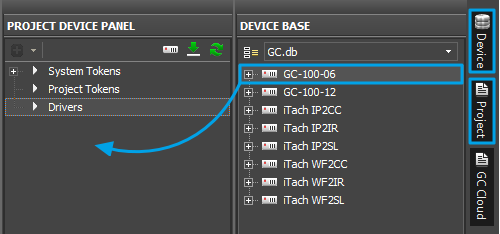
To add the Global Cache module to the project device panel use the Drag&Drop method – dragging the converter from the iRidium database window to the project device panel:
Open the Project Device Panel tab and drag the driver of your Global Cache device there.
Using of Global Cache Database:
iRidium GUI Editor has the Global Cache Database tab. You can use the base of IR command for controlling various equipment via IR. This base is not stored in Editor. You will need connection to the Internet to access it:
Go to the Global Cache DataBase tab.
In the Manufacturers field select the manufacturer of the controlled device
(for example, Samsung)
In the Device Type field select the type of your device
(for example, TV).
Find Codeset of your device and add it using the Drag&Drop method to Project Device Panel on the required IR output of the Global Cache device.
How to select Codeset for your IR device:
1. If you have one or several commands for your IR device, compare them to the commands with the corresponding application in each of the typical Codesets, select the suitable set of commands.
2. Using Global Cache IR Learner read several IR commands from the remote for your equipment and compare them to the commands of typical Codesets.
3. Add Codesets in your project and select the one which is suitable for your device.
PS: Information about the Codeset which should be used is difficult to find in the documentation to equipment. But it is the most efficient way of storing IR commands. That is why it is necessary to find commands for particular devices by test.
At that the preparation of the IR device is completed and you can use it in your automation projectНа этом подготовка ИК устройства завершается и можно перейти к его использованию в проекте автоматизации.
| If you cannot find your equipment in the Global Cache data base, create the bade of IR commands with the help of the instruction for creating the base of IR commands |
Assigning IR Commands to Interface Items
IR commands created for using in your automation project have to be added in Project Device Tree. IR devices do not exist as independent iRidium controlled objects – they are always peripheral in regard to Global Cache converters as controlling via IR cannot be performed directly from an iRidium panel without using format converters.
Therefore in order to add an IR device in the project it is required to add the Global Cache converter from the standard iRidium base first, and then add the IR device to the preconfigured IR output of the converter.
Creating Project GUI
Create a new project in iRidium GUI Editor and form a necessary number of graphic items for IR commands in it. The interface can look like a standard IR remote control or different as it is convenient for the user:
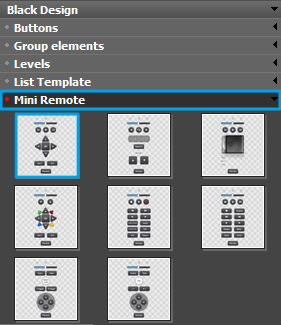
Create graphic items with the help of the Draw Item tool. The detailed description of graphic item creation can be found here. You can also use the ready remote from Gallery provided with the sample design Black GUI.
Setting up Connection to Global Cache
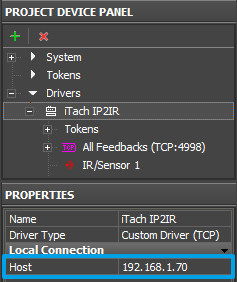
For connecting iRidium to the Global Cache converter indicate the local IP-address in general settings of the converter located in the PROPERTIES window of Project Device Panel:
Host – an IP-address of the controlled Global Cache converter.
You can learn local (private) address of the Global Cache converter for working within the local IP-network with the help of iHelp (download) or from the documentation "Quick Start Guides" at the first launch of the converter.
To work with the Global Cache converter via the Internet indicate the public IP-address of the router the converter is connected to. Set up the Port Forwarding service for the router – to enable referring to the local address of the controlled converter from the Internet (remote control).
You can learn the external (public) IP-address of your router with the help of external resources, for example [1]
Switching the Local and Public IP-addresses of Global Cache
To change properties of connection to Global Cache when working with the project on control panel, the method based on using the script function (SetParameters). In case with Global Cache modules this function is more complicated than the same function for other equipment. It is due to the fact that GC can use from 1 to 3 ТСР ports for connection. The content of the function depends on the model of the Global Cache converter.
How to add Wi-Fi/3G switching in your project:
To add the function of changing connection properties in your iRidium project, open the script editor in iRidium GUI Editor.
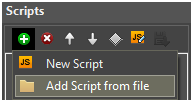
Add the ready SetParameters function (Add Script from file) for your для Global Cache, HERE], or create a new empty module (New Script). Set up and copy the function as many times as it is necessary.
function GC_100_06_Internal()
{
      IR.GetDevice('GC-100-06:All Feedbacks (TCP:4998)').SetParameters({Host: '192.168.1.70', Port: '4998'});
      IR.GetDevice('GC-100-06:Serial 1').SetParameters({Host: '192.168.1.70', Port: '4999'});
}

function GC_100_06_External()
{
      IR.GetDevice('GC-100-06:All Feedbacks (TCP:4998)').SetParameters({Host: '220.110.11.22', Port: '4998'});
      IR.GetDevice('GC-100-06:Serial 1').SetParameters({Host: '220.110.11.22', Port: '4999'});
}
function GC_100_12_Internal()
{
      IR.GetDevice('GC-100-12:All Feedbacks (TCP:4998)').SetParameters({Host: '192.168.1.70', Port: '4998'});
      IR.GetDevice('GC-100-12:Serial 1').SetParameters({Host: '192.168.1.70', Port: '4999'});
      IR.GetDevice('GC-100-12:Serial 2').SetParameters({Host: '192.168.1.70', Port: '5000'});
}

function GC_100_12_External()
{
      IR.GetDevice('GC-100-12:All Feedbacks (TCP:4998)').SetParameters({Host: '220.110.11.22', Port: '4998'});
      IR.GetDevice('GC-100-12:Serial 1').SetParameters({Host: '220.110.11.22', Port: '4999'});
      IR.GetDevice('GC-100-12:Serial 2').SetParameters({Host: '220.110.11.22', Port: '5000'});
}
function iTach_single_Internal()
{
      IR.GetDevice('iTach Flex single port:All Feedbacks (TCP:4998)').SetParameters({Host: '192.168.1.70', Port: '4998'});
      IR.GetDevice('iTach Flex single port:Serial').SetParameters({Host: '192.168.1.70', Port: '4999'});
}

function iTach_single_External()
{
      IR.GetDevice('iTach Flex single port:All Feedbacks (TCP:4998)').SetParameters({Host: '220.110.11.22', Port: '4998'});
      IR.GetDevice('iTach Flex single port:Serial').SetParameters({Host: '220.110.11.22', Port: '4999'});
}
function iTach_Multiply_Internal()
{
      IR.GetDevice('iTach Flex Multiply:All Feedbacks (TCP:4998)').SetParameters({Host: '192.168.1.70', Port: '4998'});
      IR.GetDevice('iTach Flex Multiply:Serial').SetParameters({Host: '192.168.1.70', Port: '4999'});
}

function iTach_Multiply_External()
{
      IR.GetDevice('iTach Flex Multiply:All Feedbacks (TCP:4998)').SetParameters({Host: '220.110.11.22', Port: '4998'});
      IR.GetDevice('iTach Flex Multiply:Serial').SetParameters({Host: '220.110.11.22', Port: '4999'});
}
function iTach_IP2IR_Internal()
{
      IR.GetDevice('iTach IP2IR:All Feedbacks (TCP:4998)').SetParameters({Host: '192.168.1.70', Port: '4998'});
}

function iTach_IP2IR_External()
{
      IR.GetDevice('iTach IP2IR:All Feedbacks (TCP:4998)').SetParameters({Host: '220.110.11.22', Port: '4998'});
}
function iTach_WF2IR_Internal()
{
      IR.GetDevice('iTach WF2IR:All Feedbacks (TCP:4998)').SetParameters({Host: '192.168.1.70', Port: '4998'});
}

function iTach_WF2IR_External()
{
      IR.GetDevice('iTach WF2IR:All Feedbacks (TCP:4998)').SetParameters({Host: '220.110.11.22', Port: '4998'});
}
In the function settings for your project change the IP-address of you GC module – local and external, depending on what you set.
Activation of the function created with the help of iRidium Script is performed by the Script Call (Macros Editor) command which should be added on Press or Release event of the button which you want to use for switching properties of connection to Global Cache.
Go to Macros Editor of the button, select the Script Call and assign the command to the button by double clicking it. In the dropdown list you will see the list of SetParameters functions created by you. Select the function (the setoff properties) for your button:
>> Download: example of switching local and external properties of connection to Global Cache
To work with the Global Cache converter via the Internet indicate the public IP-address of the router the converter is connected to. Set up the Port Forwarding service for the router to enable remote control - referring to the local (private) address of the controlled Global Cache converter from the Internet.
You can learn the external (public) IP-address of your router with the help of external resources, for example [2]
![]() To work with Global Cache via the Internet indicate the public IP-address of the router Global Cache is connected to. Set up the Port Forwarding service for the router to enable remote control - referring to the local (private) address of the controlled Global Cache converter from the Internet.
To work with Global Cache via the Internet indicate the public IP-address of the router Global Cache is connected to. Set up the Port Forwarding service for the router to enable remote control - referring to the local (private) address of the controlled Global Cache converter from the Internet.
You can learn the external (public) IP-address of your router with the help of external resources, for example [3]
Assigning IR commands to Project Graphic Items
To initiate the command sending when pressing on a graphic item or at some system event it is required to relate commands in the Project Device Panel tree with interface graphic items.
There are several types of events at which the command sending for Global Cache can be performed:
- Press – sending commands when pressing on the graphic item the commands are assigned to
- Release – sending commands when releasing the graphic item (after pressing)
- Hold – sending commands when holding the graphic item (in cycles, as long as the item is not released) (works with Button, Multistate Button only)
When working with IR commands there might be the following scenarios of command sending at system events:
- Sending a single IR command when pressing on (releasing) the button
- Sending a macro – a sequence of IR commands when pressing on (releasing) the button
- Sending an IR command on hold – the command is sent with the preset frequency until the button it held
Different scenarios of sending IR commands are performed with the help of the iRidium GUI Editor tools. Below you can find mechanisms for the implementation of the scenarios of sending IR commands described above:
Sending a Single IR Command When Pressing on (Releasing) the Button
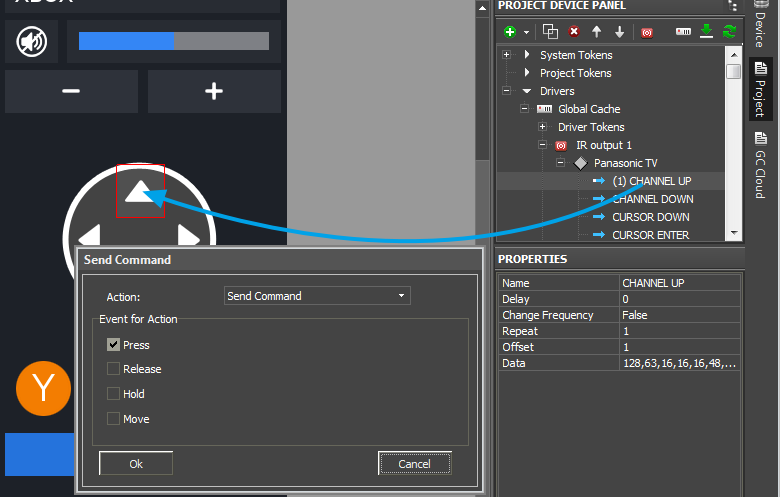
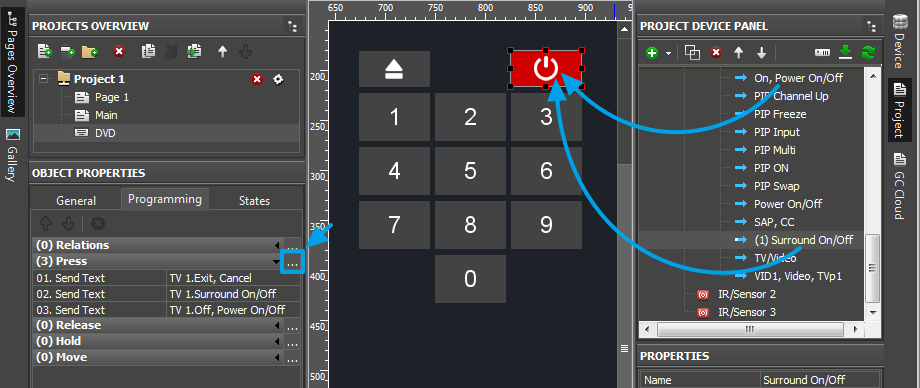
In order to send a Global Cache IR command created on the converter output drag it to the graphic item pressing on (releasing) which will initiate the command sending:
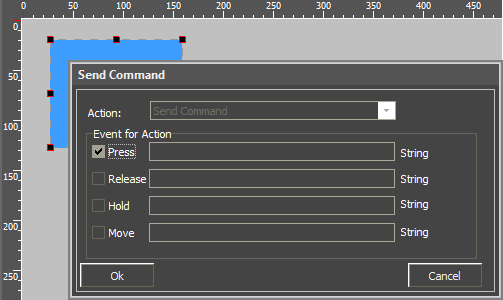
The Send Command dialog window will appear where you need to select the type of item event at which the command will be sent to the device.
- Press – pressing the item
- Release - releasing the item
- Hold - holding the item
- Move – moving on the item (mainly for Level type items)
The Press event is indicated by default as it is the most frequently used one:
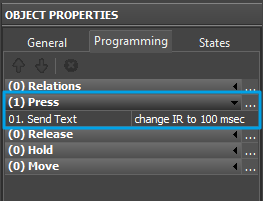
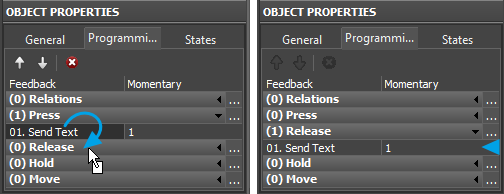
You can see added commands of the item in the Programming tab of the Object Properties panel.
The command will appear in the Programming tab of the Object Properties window and will be fixed in the Press event. It means the command will be sent when pressing on this graphic item. To send the command when releasing the item drag it to the Release tab:
* it is required to drag the command by its text (name)
Sending Macros – Sequences of IR Commands When Pressing on (Releasing) the Button
When creating a macro of IR commands it is important to remember that IR commands require time for their sending by IR emitters. It usually takes 150-300 ms to send an IR command. It is important not to overlap one command by another in the process of sending. So there is a compulsory rule:
IR commands contained in one macro which are sent sequentially from one IR output of the Global Cache converter have to be sent with the interval of 150-300 ms depending on their length to avoid overlapping and incorrect sending.
You can set intervals between sending IR commands of one macro to the IR emitter of the Global Cache converter in the Macros Editor window. Here you can form macros for each event (Press, Release, Hold) of command sending in iRidium (access to the window of setting up macros of graphic items: Object Properties > Programming > Action Press, Release, Hold).
Before setting up intervals between sending the commands (of the macro) drag all commands which will be parts of one macro to the graphic item. For example, let us form the macro of turning on channel 12 on Panasonic TV. In order to do that it is required to send commands of turning on channel 1, then 2, then confirm your actions (ОК): 1 > 2 > OK
Drag the required commands to the corresponding graphic item:
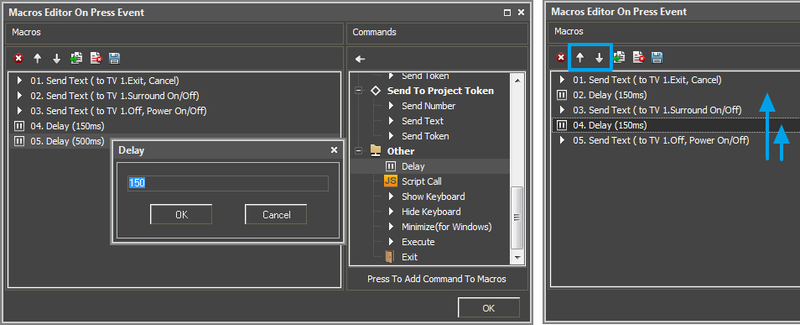
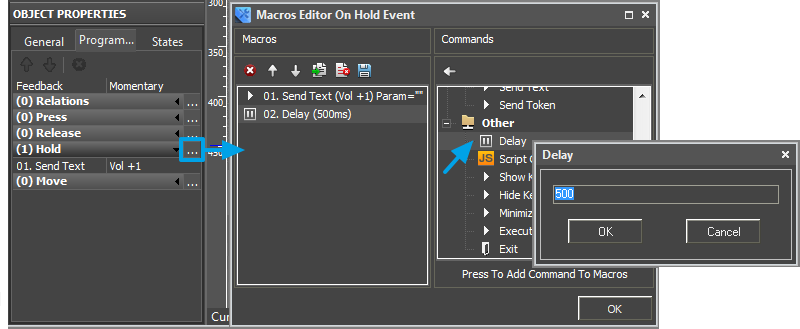
Then indicate the interval between the IR commands of the macro. In order to do that, go to the Macros Editor window and use the tools for forming macros. To set the delay between performing the strings of the macro use the Delay function (ms) in the Other section of the window of functions for forming macros. Adding of the delay function is performed by double-clicking or with the help of the arrow on the tool box:
When adding the delay function indicate the time (in ms) which the command should wait until performing the next macro function in the list (commands are performed sequentially, from the top down). Form two delay commands and place them between the IR commands of the macro using arrows on the tool box for moving them:
At that the creation of the IR command sending macro is completed. You can also add commands of switching project pages and popups to IR commands. For example, when performing a big macro you can show the popup informing the user about that and preventing any other actions which can affect the correct sending of IR commands.
Sending an IR Command on Hold with the Preset Frequency
Sending an IR command on "Hold" means that the IR command is sent by the IR emitter of the Global Cache converter all the time the button with the active Hold event is pressed on. At that the IR command will be sent with the frequency set up in the macro of the Hold event.
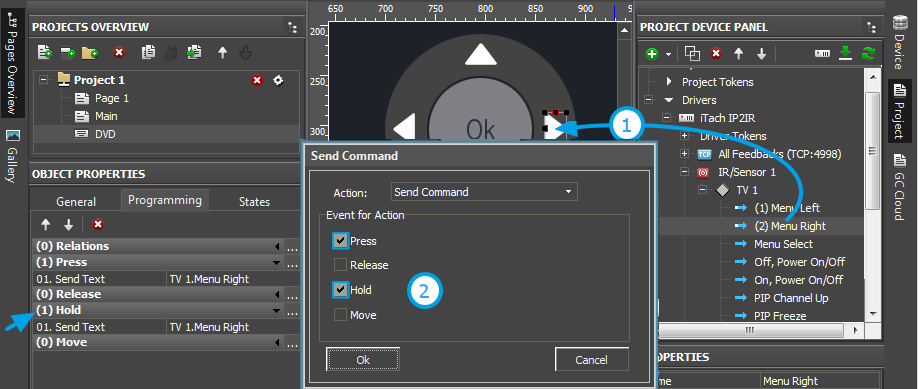
To set up the command sending "on hold", select the IR command which should be repeated in cycles when the button is pressed on. This way of command sending is often used for controlling volume (the volume increases one point each time the IR command is sent). Drag the command to the graphic item it should be sent from:
The command will be added to the Press event (sending on press), move it from there to the Hold event (sending on hold). To send the command at the item hold event, drag it to the tab of the Hold event by the Drag&Drop method (this event works with Button and Multistate Button only):
* it is required to drag the command by its text (name)
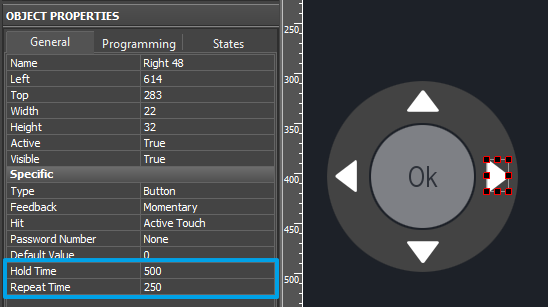
Now it is required to create a macro of the Hold event which will be processed in cycles until the button in pressed on. The macro is the combination of the IR command and the time of delay required for its sending. The delay defines the frequency the IR command is sent when holding the button. Usually it is 150-300 ms or more.
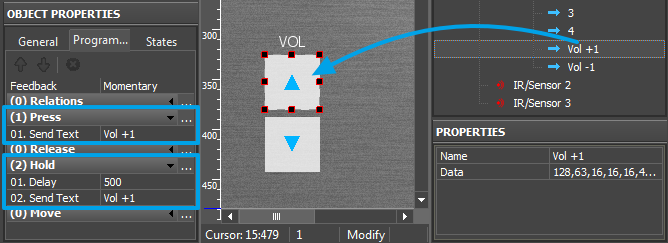
Such item will work on hold (send commands when the button is pressed on). In order to assign to one item commands preformed on press and on hold it is necessary to form the macro as follows:
- Create a command of single value increase for the Press event
- Create a command of value increase for the Hold event as it is described above but with the delay (Delay) which is BEFORE the command not after it like in the previous case.
It will provide the following algorithm of macro functioning on the item: when pressing on the button the command of the Press event providing single value increase is sent and then in the period of time set by the Delay property the command starts to work in cycles of the Hold event. It allows you to avoid overlapping of commands for macros of the Press and Hold events and provides separation of these events in the process of working with the project:

