Instructions for working with iRidium for AMX
Contents
- 1 Launching Projects for Controlling AMX on Control Panels
- 2 Adding and Setting up Projects in Transfer
- 3 Searching Panels in Transfer
- 4 Receiving and Using Licenses
- 5 Binding of Panels, Projects and Licenses in Transfer
- 6 Uploading Projects and Licenses on Panels
- 7 Switching Between Wi-Fi and 3G
- 8 Creating Dynamic Lists in TPDesign4: IRLB Commands
- 9 Creating and Improving Projects for АМХ in GUI Editor
Launching Projects for Controlling AMX on Control Panels
The launch of iRidium projects on control panels is performed with the help of the iRidium Transfer application installed on your PC. 8 stages can be outlined from the moment of project creation until its launch:
Creating Projects
If you prefer to create projects using AMX TPDesign4, you can just upload a ready project (*.TP4) on iRidium panels. It is performed with the help of iRidium Transfer on Pc and does not require additional editing of the project or installing any software on the АМХ controller.
If you want to use unique visualization capabilities of iRidium (scripts, scrolling lists, modules for media servers, etc.) you can edit your *.TP4 file in iRidium GUI Editor or create a new project there.
"Patcher" for TPDesign4
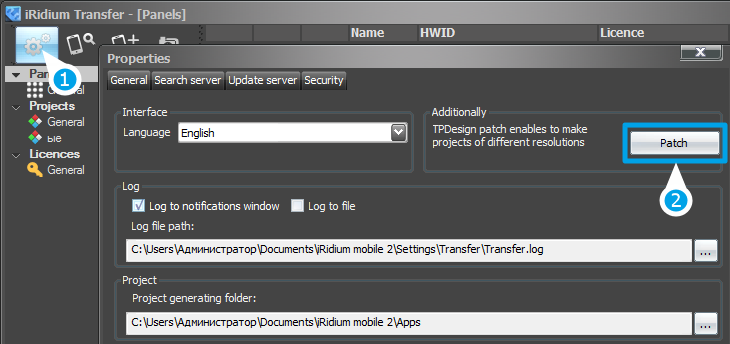
iRidium patcher can add additional project resolutions in AMX TPDesign4.
It is necessary for creating projects with resolutions for iPad, iPhone, Android, Windows…(project resolution should not be more than 2000 px – it is the limitation of TPDesign4, there are no such limitations in iRidium GUI Editor ).
iRidium patcher is included in iRidium Transfer:
Adding and Setting up Projects in Transfer
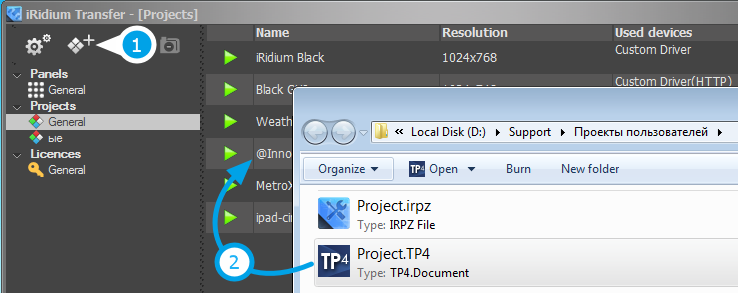
Projects can be added to Transfer by dragging (1) or with the help of the “Add Project” button (2). Properties for launching projects on different OS can be set up in the “Projects” tab:
Setting up Properties of Connection to the AMX Controller
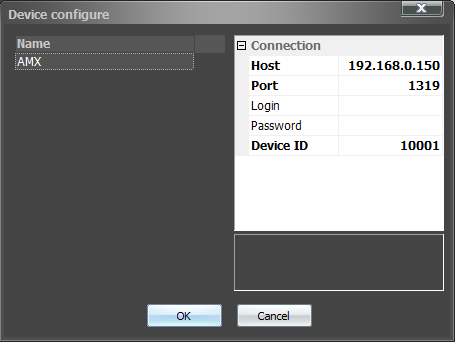
TPDesign4 (TP4) projects do not store properties of connection to the controller in them. The properties should be set up when adding projects in Transfer. The window with settings will open automatically when adding a new project (the properties can be edited later). In this window it is necessary to indicate:
| Settings for connection to АМХ | |
| Host | IP-address of the АМХ controller in the local network |
| Port | Port for sending commands to the controller (always 1319) |
| Login | Login for connection when using secure sessions |
| Password | Password for connection when using secure sessions |
| Device ID | Unique panel identifier (Panel ID) - it should be different for different panels |
Unique Properties of Connection to АМХ When Loading One Project on Different Panels
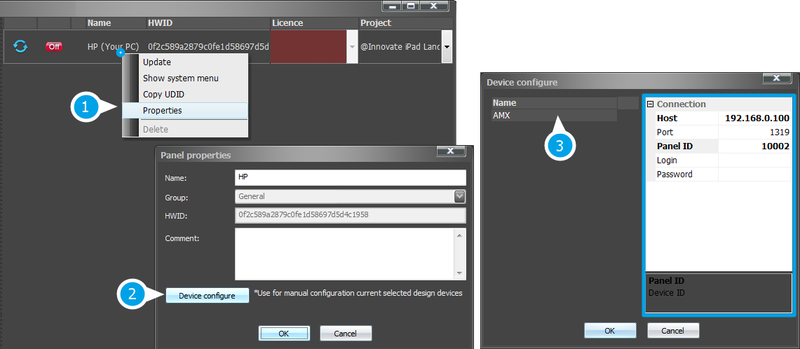
When one visualization project should work on different control panel eacj panel should have its own unique Device ID, otherwise there will be a conflict of identifiers. In order to do that you need to set up properties of connection in Transfer. The setting up should be made in the settings of each PANEL, not in the project settings.
You are able to indicate the unique settings for a panel after the panel is added in Transfer and you indicated the project for controlling AMX for it. As an example of your own PC (the client which is added in Transfer at the first launch), the access to the settings is received as follows:
Searching Panels in Transfer
Visualization projects can be uploaded on control panels with installed iRidium App. To display panels in Transfer there is the «Search» tool for finding panels in the local network.
To start the search of panels by the Transfer application do the following:
- Start iRidium App on the control panel
- Click on the “Search” button in the Transfer application (the progress bar of network scanning will appear)
As a result, in the “Panels” tab you will see all panels where iRidium App was running at the time of the network scanning. If you can’t find panels in the network read the following instruction:
Solving Problems with Project Upload and Panel Search
Receiving and Using Licenses
iRidium licenses are required to enable control panels to send commands to the AMX controller and receive feedback from it. Without a license only athe graphic part of the project is fully functional.
How to choose a license? ♦ How to buy a license? ♦ How to activate a license? ♦ How to use a license?
|
|
It enables ANY panel to connect to one AMX controller selected when activating the license. |
When selecting the license you should consider the following parameters:
1. The number of control panels you want to control your equipment from
If you plan to use not more than 3-4 control panels Device License is the best choice for you. If you want to use more control panel it is more cost-efficient to use Site License.
2. Necessity to use iRidium Script functions (for projects created or edited in редакторе iRidium GUI Editor)
If you edited the project for controlling AMX and added script modules in it (for example, Yahoo weather widget, modules for controlling Sonos, iTunes, XBMC, etc.) then you need a Pro license – it enables feedback receipt from script modules.
Otherwise you need any license for controlling AMX ( not Pro).
- Example 1: Project for controlling the AMX controller from one iPad.
The most suitable license is Device License for AMX.
- Example 2: Project for controlling AMX equipment, Sonos media server (Sonos is set up in iRidium GUI Editor) from Windows PC. The most suitable license is Device License Pro for AMX.
- Example 3: Project for controlling AMX from more than 4 different panels (iPad, Android, Windows PC, Mac). The most suitable license is Site License for AMX.
The process of receiving a license consists of several steps:
- Receive the activation key on the iRidium Mobile web site > BUY or from iRidium distributors
- Receive an identifier for the panel or controller for binding the license - HWID, UDID, Serial Number
- Activate the key on the iRidium mobile web site > MY ACCOUNT > MY LICENSES
- Save the license file (it has the format *.irl) on your PC
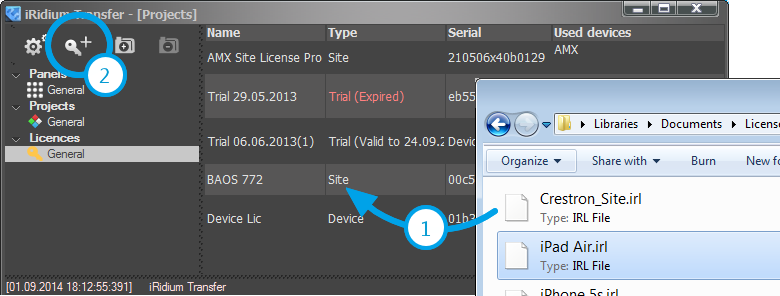
- Add licenses in Transfer using the Drag&Drop method or the «Add» button:
Binding of Panels, Projects and Licenses in Transfer
In the Design and License fields in the “Panels” tab indicate the ones which will be uploaded on the panel.
Uploading Projects and Licenses on Panels
When the Transfer application and iRidium App are set up everything is ready for uploading the project on the panel.
Sending the Project when Clicking on the “Reload” button in Transfer
You can update the project on the panel forcedly with the help of the Transfer application when iRidium App on the panel is launched and open.
For the forced update use the Reload button in the Transfer Panels window. The panel status in Transfer has to be Online for the update to work. The panel goes Online when iRidium App is launched and open.
If the indicator of the panel does not become green at the iRidium App launch, see the section
Solving Problems with Project Upload and Panel Search
Indicators of the panel status in Transfer:
After the upload of the final project version deactivate the "Update" check box
in the iRidium App settings (select "No") to fasten the application launch.
Switching Between Wi-Fi and 3G
iRidium panels can connect to the АМХ controller in the local network or via the Internet. For switching between Wi-Fi (local network) and 3G (Internet, remote connection) it is required to create buttons which will initiate change of the connection settings. At that two variants are possible:
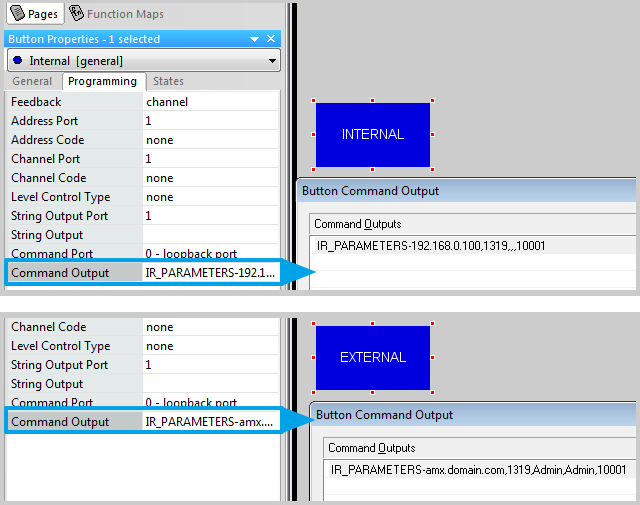
- 1. If the project is created in TPDesign4, then for changing the connection settings you should use the command which is formed in TPDesign4 (Button Command Output) or can be sent to iRidium panels from the АМХ controller:
- Syntax of the command for switching properties in TPDesign4:
IR_PARAMETERS-<host>,<port>,<login>,<password>,<panel_id>
- 2. If the project is created in iRidium GUI Editor then for changing the connection settings you can use the iRidium Script command which is formed in the Script Editor tab of iRidium GUI Editor.
- Syntax of the command for switching properties in iRidium GUI Editor:
IR.GetDevice("AMX").SetParameters({Host: "<host>", Port: "<port>", DeviceID: "<panel_id>",
Login: "<login>", Password: "<password>"});
Example of Implementing for TPDesign4
The command IR_PARAMETERS-<host>,<port>,<login>,<password>,<panel_id> , which you can create in TPDesign4, will work on iRidium panels only. It will allow you to change the IP-address, port, Panel ID, login and password of connection to the АМХ controller when working on the project on the control panel.
You can activate this command (just like any other) from the controller:
send_command dvTP, "'IR_PARAMETERS-192.168.0.100,1319,Admin,Admin,10001'"
and when pressing on the button on iRidium panel (Button Command Output):
IR_PARAMETERS-192.168.0.100,1319,Admin,Admin,10001
Creating Dynamic Lists in TPDesign4: IRLB Commands
Dynamic iRidium List (List) is an item in AMX projects. On its basis you can form a scrolling list from one popup (template). Components of the scrolling list can be added or deleted during project work on your control panel.
The number of list components is set up by the controller command and can be limited by the settings of the graphic item – the list basis. You can change the content of the popup (template) in each list component when working with the project with the help of special commands.
>>> Creating Dynamic Lists in AMX TPDesign4 >>>
Creating and Improving Projects for АМХ in GUI Editor
iRidium GUI Editor gives you the following advantages when developing projects for АМХ:
- The project size can be selected manually
- Convenient tools for working with graphics: wizard of interfaces, gallery of images, standard projects and ready script modules
- TP4 projects can be opened in GUI Editor and edited as you like
- Easy setup of commands and addresses for AMX, new way of work with control items
- Simultaneous work with several controllers
- Controll of any other equipment along with АМХ
- Built-in programming language on the basis of Java Script
- Static and dynamic lists
>>> Setting up АМХ Projects in iRidium GUI Editor >>>
