Global Cache: Relay Control
Contents
Global Cache (GC-100-06, GC-100-12, iTach IP2IR, iTach WF2IR) is a family of converters for connecting to control contacts of relays, drives and other equipment. A converter receives a command via TCP/IP and locks or unlocks one of its contacts according to the command. Converters can send commands in the local network or via the Internet. There are Global Cache preset drivers in iRidium.
Description of work:
iRidium for Global Cache supports connection with Global Cache converters via TCP/IP. When the connection is established, you can send commands of locking or unlocking contacts to the converter. The converters contacts are unlocked by default, when the power is lost by the converter, the contacts unlock automatically.
Feedback from the Global Cache converter includes information about the state of the converter and its contacts.
iTach converters support up to 4 connections of control panels. Information about the GC state is sent to all opened ТСР-sockets, enabling each connected panel to update the contacts status. The mode of multiple connections can be activated or deactivated through the iTach web-interface.
![]() GC-100 converters support only 1 connection. It means that only one panel can control relays and receive their status at a time.
GC-100 converters support only 1 connection. It means that only one panel can control relays and receive their status at a time.
Principles of Controlling Global Cache Relays
You can use "Global Cache" modules for controlling information contacts of relays, motor drives (shutters, gates, etc.) and other equipment in iRidium. The scheme of communication between iRidium and controlled equipment looks as follows:
Protocol for sending data to the converter: TCP/IP.
Channel for connection the converter to the controlled equipment: dry contact
Feedback from equipment: the converters status, the status of dry contacts
Required license: "Device License Pro for AV & Custom Systems" or "Site License Pro for Global Cache" (see Licensing). They work with Global Cache and any AV equipment. It enables use of any scripts in your projects.
Setting up Global Cache
A Global Cache (GC) converter should be connected to the local network and set up to enable iRidium to connect to it. Information on setting up GC:
Video-lessons on setting up Global Cache converters
Documentation and a set of commands for Global Cache converters
Global Cache Models with Dry Contact

|
iTach WiFi to СС (Contact Closure)
|
iTach IP to СС (Contact Closure)
| |

|
GC-100-12, GC-100-18, GC-100-18R
|
Setting up of Global Cache Modules in iRidium
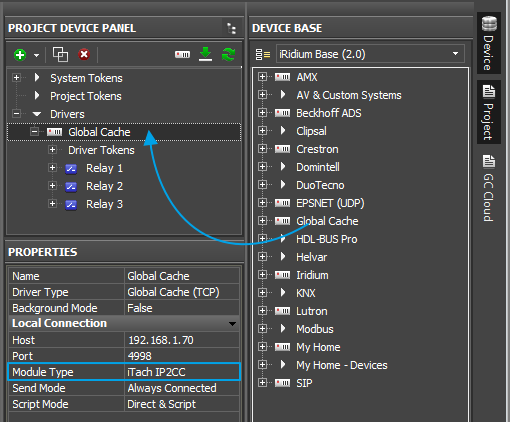
Select the Global Cache driver in the DEVICE BASE drop-down list of iRidium GUI Editor and drag the required converter into the PROJECT DEVICE PANEL window:
Properties of connection to Global Cache:
- Host – the IP-address of the converter (local, external or the domain name)
- Port – the main port of connection with GC (4998). It is used for sending IR commands, setting up and receiving the Global Cache status.
- Module Type – the type of the Global Cache converter: GC-100-06, GC-100-12(18,18R), iTach IP2IR (WF2IR), iTach IP2SL (WF2SL), iTach IP2CC (WF2CC). It defines the number of converter outputs and their type.
- Send Mode – the mode of connection to the converter
- Always Connected – constant connection (standard mode)
- Connect when Sending – connection only for command sending. It is meant for GC-100-06(12,18,18R) to which you need to connect several control panels
- Confirm IR – to send the IR command only after confirming the sending of the previous one. It helps to avoid overlapping of IR commands.
- Script Mode – it defines where to send commands
- Direct and Script – to send the command to the converter right away and duplicate it in the script (data can be processed in iRidium Script)
- Script Only – to send the command to the script only (when clicking the button the command will not be sent to the converter). It enables sending of command components to the scripts to drivers work. Do not activate this mode if you do not use scripts.
When working with GC-100, you have to set up properties for working with IR outputs, see Global Cache: Control via IR.
To connect to equipment via the Internet:
- 1. Indicate the public address of your Internet router in the Host field
- 3. Set up Port Forwarding on your router to enable remote control of your equipment .
- You can learn the public IP-address of your router with the help of external resources, for example [1]
To switch between local and Internet connection:
Use the example presented below.
Control of Global Cache Dry Contacts in iRidium
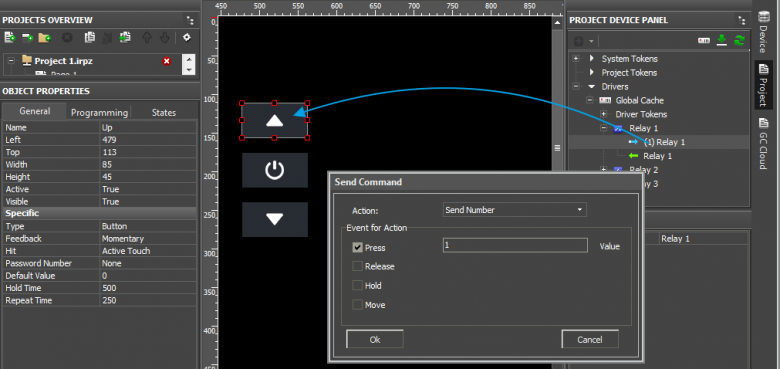
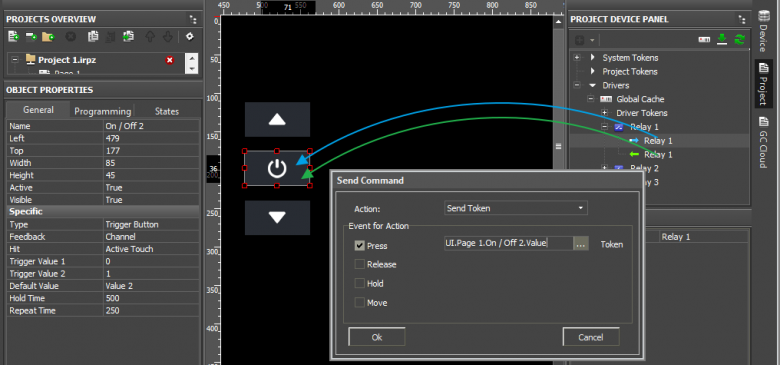
GC dry contacts can be locked with the help of Button (send value 1), unlocked (value 0), switch (0/1) with the help of Trigger Button.
Relay locking (1) and unlocking (0) is performed with the help of Button items:

Relay switching (0/1) is performed with the help of Trigger Button:

- it is required to assign a feedback channel to Trigger Button
To create a visualization interface.
Switching Between the Local and Internet Connection
If the control panel should hold the connection with the system when the panel is out of the limits of the Wi-Fi network of the system, you need to set up the switch between the Internet and the local network.
The remote mode suggests connection to the system via the Internet. At that the external IP-address or the domain name of the system to which you need to connect have to be used.
 In iRidium Wi-Fi/3G CANNOT be switched automatically. For switching between the Internet and the local network you need buttons with special settings. See the settings below.
 To control the system remotely you have to open the system for external access -
to set up the Port Forwarding Service.
 To secure equipment from unauthorized access we recommend using secure connection with the remote system (VPN).
Setting up of the switch Wi-Fi/3G in iRidium projects:
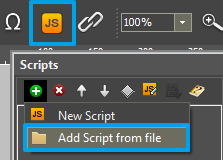
1. Open the script editor in iRidium GUI Editor.
2. Download and add into your project the template of the Wi-Fi/3G switch (Add Script from file):
download the template of the Wi-Fi/3G switch
The Wi-Fi/3G switch is performed with the help of the script function SetParameters
Setting up of parameters of the Wi-Fi/3G switch:
- function Internal_1() // Function name
- {
- IR.GetDevice('Global Cache').SetParameters({
- IR.GetDevice('Global Cache').SetParameters({
Host: "210.110.10.10", // the IP-address of the GC module
Port: 4998, // main connection port
Port1: 4999, // the port of connection to COM1 on GC (if it has COM-ports)
Port2: 5000, // the port of connection to COM2 on GC (if it has COM-ports)
SendMode: 0, // 0 - always connected, 1 - online only to send a command
IrConfirm: 0, // 0 - IR with confirmation, 1 - IR without confirmation
ScriptMode: 0, // 0 - send directly and to the script, 1 - send to the script only
BackGroundMode: 0 // 1 - on, 0 - off
}); // Driver Name + Parameters
- }
- function External_1()
- {
- IR.GetDevice('Global Cache').SetParameters({
- IR.GetDevice('Global Cache').SetParameters({
Host: "210.110.10.10", Port: 4998, Port1: 4999, Port2: 5000, SendMode: 0, IrConfirm: 0, ScriptMode: 0, BackGroundMode: 0});
- }
Indicate in the command settings:
- Function name – the name of the switch function (command). Two functions cannot have the same name in a project.
- Driver Name – the name of the driver which parameters are changed
- Parameters – the set of the switch parameters which you need to apply to the driver
Assign commands to buttons:
- Select the button which will be responsible for the Wi-Fi/3G switch.
Open the properties of the button: Object Properties > Programming - Open Macros Editor of the button for the Press or Release events
- Select the Script Call command and add it by double-clicking on it
- Select the name of the function you want to activate in the drop-down list. Create the command.
Set up access to the equipment from the Internet:
In order to do that open the equipment ports for remote access.
Download the example of the Wi-Fi/3G switch (project) >>
Switching Between the Local and Internet Connection
If the control panel should hold the connection with the system when the panel is out of the limits of the Wi-Fi network of the system, you need to set up the switch between the Internet and the local network.
The remote mode suggests connection to the system via the Internet. At that the external IP-address or the domain name of the system to which you need to connect have to be used.
 In iRidium Wi-Fi/3G CANNOT be switched automatically. For switching between the Internet and the local network you need buttons with special settings. See the settings below.
 To control the system remotely you have to open the system for external access -
to set up the Port Forwarding Service.
 To secure equipment from unauthorized access we recommend using secure connection with the remote system (VPN).
Setting up of the switch Wi-Fi/3G in iRidium projects:
1. Open the script editor in iRidium GUI Editor.
2. Download and add into your project the template of the Wi-Fi/3G switch (Add Script from file):
download the template of the Wi-Fi/3G switch
The Wi-Fi/3G switch is performed with the help of the script function SetParameters
Setting up of parameters of the Wi-Fi/3G switch:
- function Internal_1() // Function name
- {
- IR.GetDevice('Global Cache').SetParameters({
- IR.GetDevice('Global Cache').SetParameters({
Host: "210.110.10.10", // the IP-address of the GC module
Port: 4998, // main connection port
Port1: 4999, // the port of connection to COM1 on GC (if it has COM-ports)
Port2: 5000, // the port of connection to COM2 on GC (if it has COM-ports)
SendMode: 0, // 0 - always connected, 1 - online only to send a command
IrConfirm: 0, // 0 - IR with confirmation, 1 - IR without confirmation
ScriptMode: 0, // 0 - send directly and to the script, 1 - send to the script only
BackGroundMode: 0 // 1 - on, 0 - off
}); // Driver Name + Parameters
- }
- function External_1()
- {
- IR.GetDevice('Global Cache').SetParameters({
- IR.GetDevice('Global Cache').SetParameters({
Host: "210.110.10.10", Port: 4998, Port1: 4999, Port2: 5000, SendMode: 0, IrConfirm: 0, ScriptMode: 0, BackGroundMode: 0});
- }
Indicate in the command settings:
- Function name – the name of the switch function (command). Two functions cannot have the same name in a project.
- Driver Name – the name of the driver which parameters are changed
- Parameters – the set of the switch parameters which you need to apply to the driver
Assign commands to buttons:
- Select the button which will be responsible for the Wi-Fi/3G switch.
Open the properties of the button: Object Properties > Programming - Open Macros Editor of the button for the Press or Release events
- Select the Script Call command and add it by double-clicking on it
- Select the name of the function you want to activate in the drop-down list. Create the command.
Set up access to the equipment from the Internet:
In order to do that open the equipment ports for remote access.
Download the example of the Wi-Fi/3G switch (project) >>


