Basic Operation of iRidium with HDL-BUS Pro
Contents
How It Works. Ways of Connection to HDL-BUS Pro
You can use any HDL-BUS Pro IP interface to connect control panels iRidium App to HDL-BUS Pro. The broadcast data exchange is used for the communication. It is possible to send or receive data only if the control device and IP interface are in one IP subnetwork.
Ways of connection to the HDL-BUS Pro bus:
1. HDL-BUS Pro IP interface in the mode of local broadcast connection (Local)
- Characteristics:
- only the local connection of control devices is possible (without access from the Internet)
- Requirements:
- no special requirements
- Licensing:
- Device License (HDL-BUS Pro), Device License Pro (HDL-BUS Pro), Site License (HDL-BUS Pro), Site License Pro (HDL-BUS Pro). More >>
2. HDL-BUS Pro IP interface in the mode of connection via the Internet (Internet)
- Characteristics:
- the connection of control devices is possible directly via the Internet
- Requirements:
- it is required to update the firmware of the HDL-BUS Pro IP module to HDL_V04.06U
- Licensing:
- Device License (HDL-BUS Pro), Device License Pro (HDL-BUS Pro), Site License (HDL-BUS Pro), Site License Pro (HDL-BUS Pro). More >>
3. HDL-BUS Pro IP interface in the mode of connection via the HDL Internet server (Server)
- Characteristics:
- it is possible to connect control devices via the HDL server in the Internet
- Requirements:
- it is required to update the firmware of the HDL-BUS Pro IP module to HDL_V04.06U
- Licensing:
- Device License (HDL-BUS Pro), Device License Pro (HDL-BUS Pro), Site License (HDL-BUS Pro), Site License Pro (HDL-BUS Pro). More >>
Conditions for Connecting to HDL-BUS Pro via the Internet
If one of the conditions is not met, the work via the Internet is impossible. If the firmware of the HDL-BUS Pro module is old or iRidium version is earlier than 2.1.1, only the local connection mode (Local) will be possible (work within the local network).
Conditions for Using Site Licenses for HDL-BUS Pro
 Site Licenses can be used only with IP module SB-DN-1IP (generation 4), Factory Model: HDL-MBUS01IP.431
 The HDL-MBUS01IP.431 module should have the firmware HDL_V04.06U
 iRidium version: 2.1.1 and later
One Site license can be used to control one HDL-BUS Pro installation from many devices. The license is assigned to the serial number of the HDL-MBUS01IP.431 IP module. It can be uploaded on any number of control panels.
Conditions for Connection to HDL-BUS Pro
 To work in the Broadcast (Local) module, your iRidium panel and HDL-BUS Pro IP module should be in one IP subnetwork. Otherwise iRidium will not be able to receive feedback from HDL-BUS Pro, although commands could be sent to the IP module.
 Update the firmware of HDL-BUS Pro IP module, if the iRidium panel and IP module are in one IP subnetwork but you cannot receive feedback from HDL-BUS Pro
 Activate broadcast function on your router within the limits of the IP subnetwork where iRidium and HDL-BUS Pro work.
Scanning and Adding HDL-BUS Pro Devices in iRidium
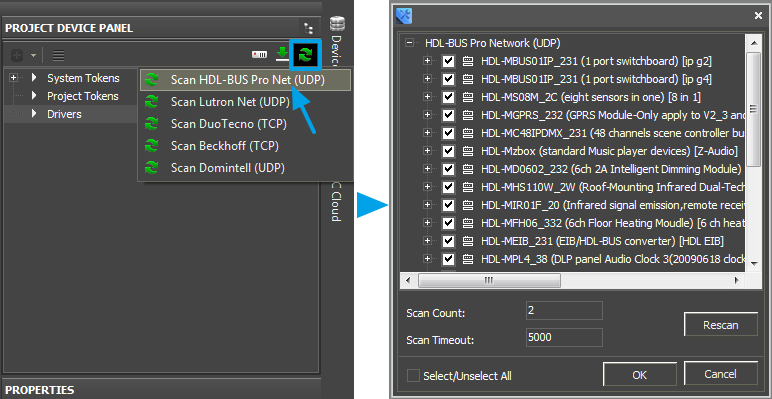
Network scanning allows you to find and add to your project all devices of the HDL-BUS Pro bus. It works similarly to HDL-BUS Pro Setup Tool. The result of the scanning is the list of devices with preset commands.
Create a new project in iRidium GUI Editor, open Project Device Panel and click Scan > HDL-BUS Pro Net (UDP)
Important!
Close HDL-BUS Pro Setup Tool before the scanning if it is running on the same PC.
Adding devices from the iRidium database
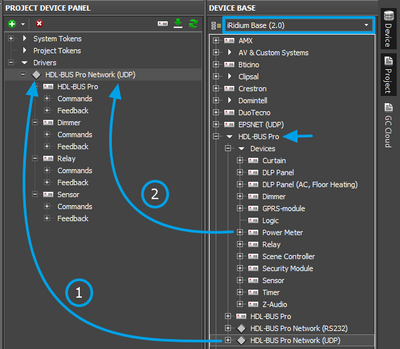
If you cannot scan the network you can use preconfigured devices in iRidium database.
First add HDL-BUS Pro Network (UDP) and then add the required devices in Network:
Connection to HDL-BUS Pro
For every set of HDL-BUS Pro devices you can set up local and Internet connection. There are different ways of data exchange with the HDL-BUS Pro bus:
Local Connection between iRidium and HDL-BUS Pro
The “Local” connection mode works in the local network only. It does not allow you to set up control of the bus via the Internet. It uses broadcast address for connection.
The mode of local connection works with any HDL-BUS Pro IP module and any IP module firmware (if you do not plan to use Site licensing). For Site licensing you need to meet the conditions stated above.
Режим локального соединения работает с любым IP модулем HDL, походит любая прошивка IP модуля (в случае, если вы не планируете использовать Site лицензию). Для Site лицензирования при локальном соединении должны выполняться описанные ранее требования.
Setting up of the HDL-BUS Pro IP module for local connection
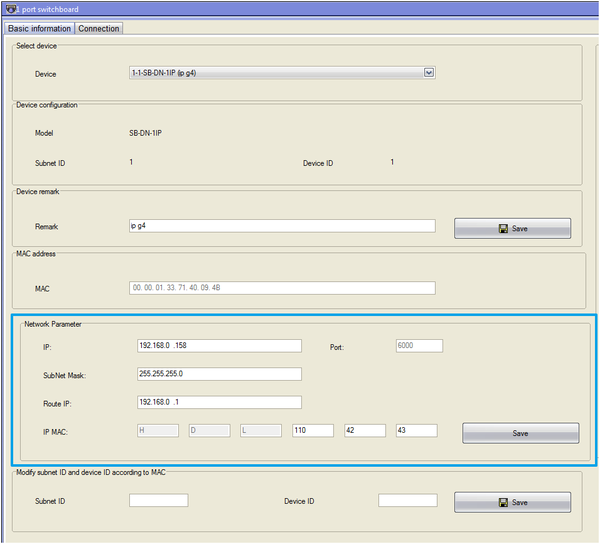
In the settings of the HDL-BUS Pro IP module indicate Network Parameter for working in the local network
- IP: the IP-address of the HDL-BUS Pro module in the local network
- Subnet Mask
- Route IP: the gateway by default
Setting up iRidium projects (GUI Editor) for connection to HDL-BUS Pro
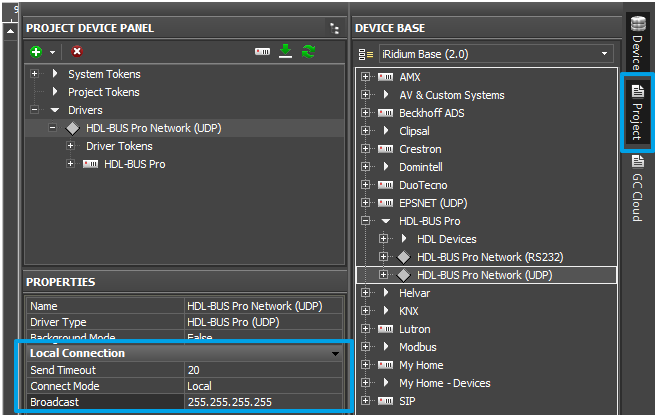
Indicate the local address for connection to the HDL-BUS Pro IP module in the settings of HDL Gateway. Upon the recommendation of the system administrator it is possible to change the broadcast address. If it is not specified, then leave the settings by default: it will guarantee the correct work with the module.
- Send Timeout: forced interval between commands which are sent by the control panel to the HDL-BUS Pro module (it helps to reduce the load on the IP module and HDL-BUS Pro bus)
- Connect Mode: Local – the mode of local connection to the HDL-BUS Pro IP module
- Broadcast: 255.255.255.255 – the broadcast address for exchanging data with HDL-BUS Pro
Internet Connection of iRidium and HDL-BUS Pro
It enables connection to the HDL-BUS Pro IP module via the Internet without using HDL Remote Server. In the Internet mode the connection is established directly between the control device and the module. For working in the local network it is required to change the “Internet” mode to “Local” in your iRidium project.
Setting up of the HDL-BUS Pro IP module for Internet connection
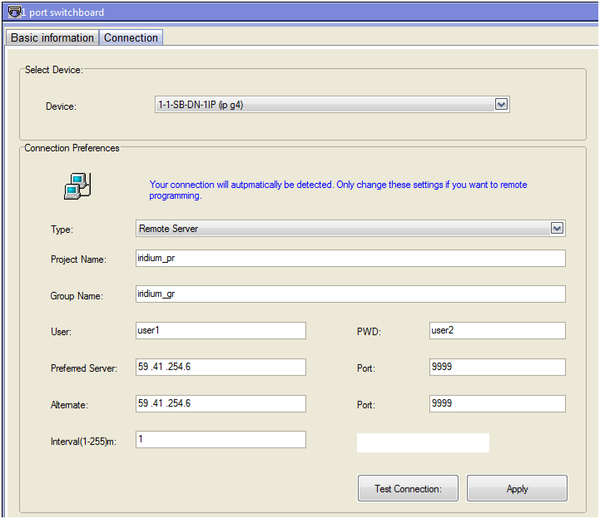
Indicate Connection Preferences - the properties of the clients which you need to connect to the HDL-BUS Pro IP module - in the settings of the HDL-BUS Pro module.
- Type: Remote Server
- Project Name, Group Name:
- User, Password: properties of secure connection
- Preferred Server, Port: properties of connection to the HDL remote server (they are not used in the “Internet” mode but should be indicated)
Setting up iRidium projects (GUI Editor) for connection to HDL-BUS Pro
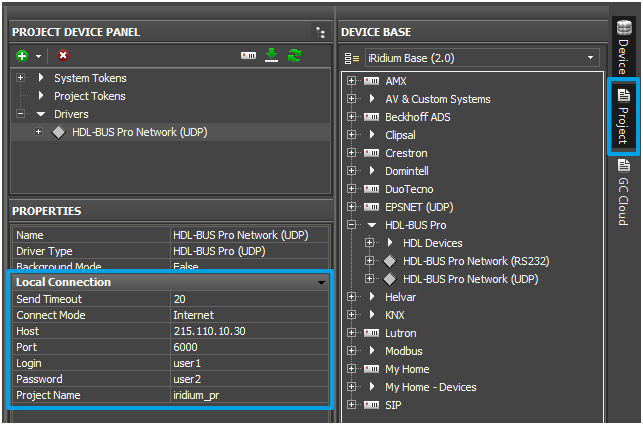
Indicate the properties of connection to the HDL-BUS Pro IP module in the settings of HDL Gateway.
- Send Timeout: forced interval between commands which are sent by the control panel to the HDL-BUS Pro module (it helps to reduce the load on the IP module and HDL-BUS Pro bus)
- Connect Mode: Internet
- Host: the address of the HDL-BUS Pro IP module in the Internet (public address)
- Port: the port of the HDL-BUS Pro IP module for connection via the Internet (public address)
- Login: from the Remote Server settings of the IP module
- Password: from the Remote Server settings of the IP module
- Project Name: from the Remote Server settings of the IP module
HDL Remote Server for Internet Connection between iRidium and HDL-BUS Pro
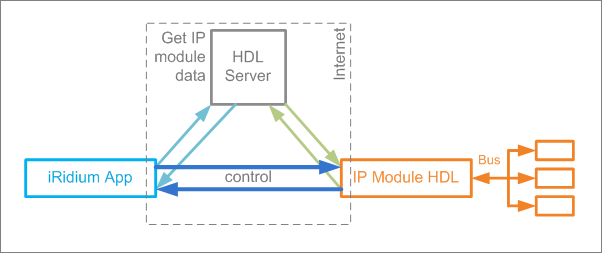
HDL Remote Server enables connection to the HDL-BUS Pro IP module via the Internet. The connection is established though the specialized HDL Internet server which is used for authorizing connections between the iRidium control panel and the HDL-BUS Pro IP router. After the authorization the connection is established directly without using the server.
Setting up of the HDL-BUS Pro IP module for Internet connection through HDL Remote Server
Indicate Connection Preferences - the properties of the clients which you need to connect to the HDL-BUS Pro IP module - in the settings of the HDL-BUS Pro module.
- Type: Remote Server
- Project Name, Group Name:
- User, Password: properties of secure connection
- Preferred Server, Port: properties of connection to the HDL remote server
Setting up iRidium projects (GUI Editor) for connection to HDL-BUS Pro
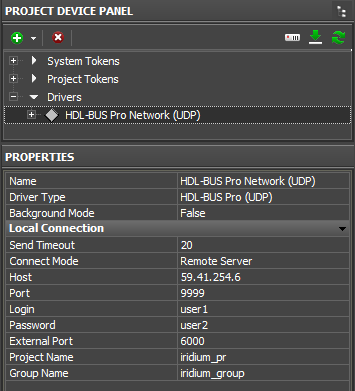
Indicate the properties of connection to the HDL-BUS Pro IP module through the IP module in the settings of HDL Gateway (UDP).
- Send Timeout: forced interval between commands which are sent by the control panel to the HDL-BUS Pro module (it helps to reduce the load on the IP module and HDL-BUS Pro bus)
- Connect Mode: Remote Server
- Host: the address of the HDL remote server
- Port: the port of connection to the HDL-BUS Pro IP module through the remote server (similar to the settings of the IP module)
- Login: from the settings of the IP module
- Password: from the settings of the IP module
- Project Name: from the settings of the IP module
Switching Local and Internet Connections
If the control panel should hold the connection with the system when the panel is out of the limits of the Wi-Fi network of the system, you need to set up the switch between the Internet and the local network.
The remote mode suggests connection to the system via the Internet. At that the external IP-address or the domain name of the system to which you need to connect have to be used.
 In iRidium Wi-Fi/3G CANNOT be switched automatically. For switching between the Internet and the local network you need buttons with special settings. See the settings below.
 To control the system remotely you have to open the system for external access -
to set up the Port Forwarding Service.
 To secure equipment from unauthorized access we recommend using secure connection with the remote system (VPN).
Setting up of the switch Wi-Fi/3G in iRidium projects:
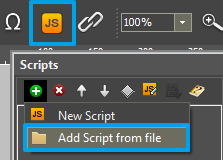
1. Open the script editor in iRidium GUI Editor.
2. Download and add into your project the template of the Wi-Fi/3G switch (Add Script from file):
download the template of the Wi-Fi/3G switch
The Wi-Fi/3G switch is performed with the help of the script function SetParameters
Setting up of parameters of the Wi-Fi/3G switch:
- function Internal_1() // Function name
- {
- IR.GetDevice('HDL-BUS Pro Network (UDP)').SetParameters({Host: "192.168.0.255",Port: "6000",SendTimeOut: "20",ConnectMode: "0"}); // Driver Name + Parameters
- }
- function External_1()
- {
- IR.GetDevice('HDL-BUS Pro Network (UDP)').SetParameters({Host: "217.115.10.10",Port: "6000",SendTimeOut: "20",ConnectMode: "2",Login: "user1",Password: "user2",ProjectName: "project_1"});
- }
Indicate in the command settings:
- Function name – the name of the switch function (command). Two functions cannot have the same name in a project.
- Driver Name – the name of the driver which parameters are changed
- Parameters – the set of the switch parameters which you need to apply to the driver
Assign commands to buttons:
- Select the button which will be responsible for the Wi-Fi/3G switch.
Open the properties of the button: Object Properties > Programming - Open Macros Editor of the button for the Press or Release events
- Select the Script Call command and add it by double-clicking on it
- Select the name of the function you want to activate in the drop-down list. Create the command.
Set up access to the equipment from the Internet:
In order to do that open the equipment ports for remote access.
Download the example of the Wi-Fi/3G switch (project) >>
Commands for Controlling HDL-BUS Pro Devices in iRidium Projects
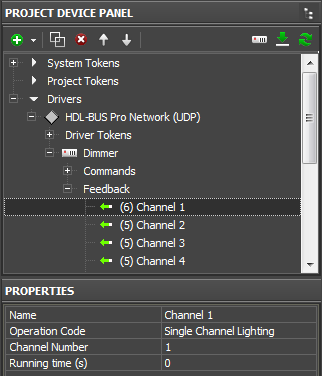
In iRidium projects HDL-BUS Pro Network (UDP) consists of 4 parts:
- Driver Tokens – the list of variables which store information about connection to HDL-BUS Pro
- Devices – the list of devices in the HDL-BUS Pro bus you need to control
- Commands – the list of commands for devices of the HDL-BUS Pro bus
- Feedbacks – the list of feedback channels for devices of the HDL-BUS Pro bus
They have the following properties and application:
Driver Tokens
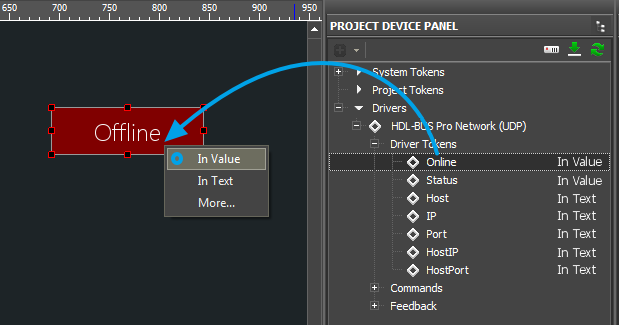
Driver Tokens - variables storing the status of connection to the controlled HDL-BUS Pro IP interface. These properties can be read only. To use a token drag it on the graphic item (the token value can be output in the item text field or it can be used to change the item state).
| Online | a state of connection to the controlled system (Online/Offline = 1/0) |
| Status | the status of connection to the system (Offline/Connect/Online/Disconnect = 0...3) |
| Host | the domain name of the remote system |
| HostPort | the port of the remote system to which iRidium App is connected |
| IP | the IP-address of the control panel |
| HostIP | an IP-address of the remote system to which iRidium App is connected |
| Port | the local port of the client through which the connection to the remote device is established |
Devices
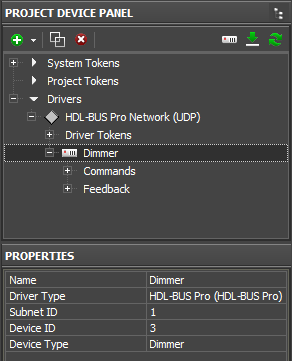
Devices – physical devices in the HDL-BUS Pro bus. They are defined by their type and Subnet ID / Device ID identifiers. Commands and channels assigned to a device will refer only to Subnet/Device ID indicated in the properties of the device.
| HDL-BUS Pro Device | |
| Name | the device name (it should be unique for the project) |
| Subnet ID | the subnetwork identifier (see HDL-BUS Pro Setup Tool) |
| Device ID | the device identifier (see HDL-BUS Pro Setup Tool) |
| Device Type | it defines available operation codes for the device |
All commands and channels of the HDL-BUS Pro device will be sent to this device identifying it by its Subnet ID / Device ID.
Commands
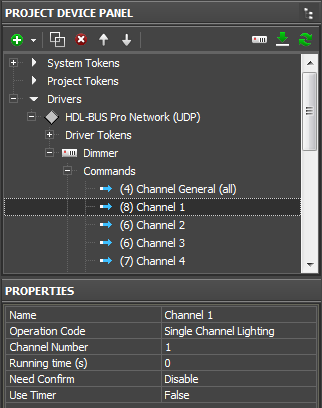
Commands are created for sending data to the bus. They are assigned to graphic items which can send data to devices in the bus.
| HDL-BUS Pro command | |
| Name | the command name (it should be unique for the device) |
| Operation Code | the command to the device |
| Channel Number | the device channel (if there is one) |
| Running Time (s) | speed of command execution |
| Need Confirm | confirmation about command delivery (only for very important modules) |
| Use Timer | sending commands on timer (at the project launch or in cycles, ms) |
All commands and channels of the HDL-BUS Pro device will be sent to this device identifying it by its Subnet ID / Device ID.
Go to examples of controlling HDL-BUS Pro equipment >>
Feedbacks
Feedback – the list of channels available for reading.
Feedback channels receive values from particular devices or channels. The received values can be output on graphic items.
| HDL-BUS Pro feedback channel | |
| Name | the channel name (it should be unique for the device) |
| Operation Code | the command to the device |
| Channel Number | the device channel (if there is one) |
| Running Time (s) | speed of execution (it is not used for feedback) |
Go to examples of controlling HDL-BUS Pro equipment >>
Emulation of Project Work
Emulator
- is an iRidium application for Windows which can be launched from GUI Editor for testing your projects. Emulator can work both with a license (with connection to the equipment) and without it (when only the project graphic part is functional).
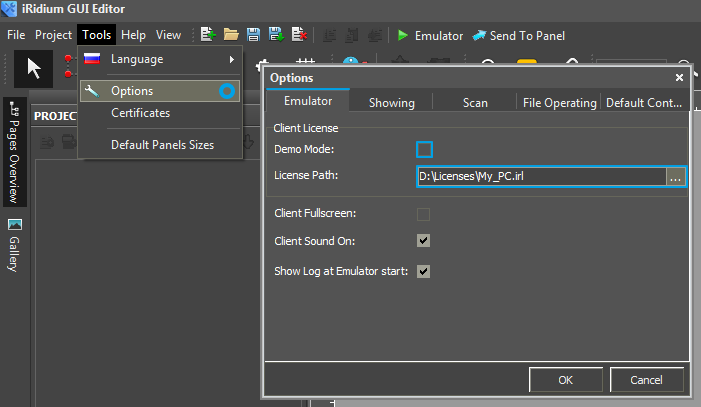
Operation modes for Emulator (see GUI Editor > Tools > Options > Emulator):
- Without the license (Demo Mode: on) – no connection with the controlled equipment.
- With the license (License Path: [...]) – when the license file is selected, all Emulator functions work and there is connection with the controlled equipment.
Indicate the path to the license file for Emulator (GUI Editor > Tools > Options > Emulator):
* When Demo Mode is activated Gui Editor won’t show the message about starting without the connection to the controlled equipment (without a license). Check if there is a license when setting up your project.
Emulator hot keys
- Click F5 to start Emulator.
- Click F8 to open the Emulator settings (password: 2007)
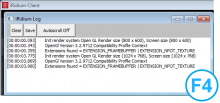
- Click F4 to open the Emulator log.
| For fully functional work of iRidium on your PC it is required to get an iRidium license and activate it for for your PC. Activation of licenses for iPad/iPhone/Mac/Android based or other devices does NOT lead to the automatic licensing of the PC with the installed iRidium Environment. A license for your PC is required for iRidium client on your PC (including Emulator) to work in the fully functional mode. The license should be purchased separately or you can use free For testing purposes you can use free licenses). |
Logging in Windows
iRidium Log is a window where information about iRidium work, error messages and iRidium Script logs (IR.Log) are output in the text format.
To open the iRidium log in Windows, click F4.
Launching Projects on Control Panels
Uploading and launching of iRidium projects on control panels are performed with the help of the iRidium Transfer application installed on your PC. You can also upload your project on the panel from GUI Editor with the help of Transfer.
- Instructions for setting up properties of the iRidium project launch on control panels: Properties for Launching iRidium Projects
- Instructions for uploading iRidium projects on control panels: iRidium Transfer.
- Instructions for setting up iRidium projects on control panel: iRidium App

