Setting up Communication with EPSNET
Contents
How it works
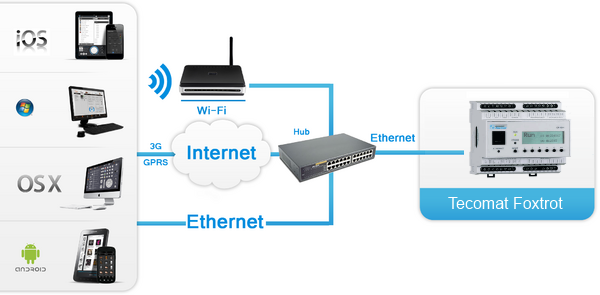
To connect iRidium App to controllers the EPSNET mode (UDP transport) is used.
It is possible to send or receive data only if the control device and the controller are in one IP subnetwork. Topology of connecting iRidium App to controllers:
Connection to Controllers
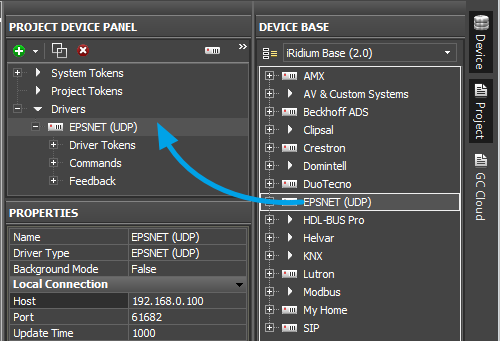
Add the EPSNET driver to your project and set up properties of connection to the controller:
Properties of connection:
- Host – the IP-address in the controller
- Port – the UDР port of connection to the router. For EPSNET it is always 61682.
- Update Time (ms) – frequency of updating data
For working with the controller via the Internet indicate the public IP-address of the router the controller is connected to in the connection settings. Port Forwarding Service is set up for the router to enable remote control – referring to the local (private) address of the controlled controller from the Internet.
You can learn the external (public) IP-address of your router with the help of external resources, for example [1]
Switching Between the Local and Internet Connection
If the control panel should hold the connection with the system when the panel is out of the limits of the Wi-Fi network of the system, you need to set up the switch between the Internet and the local network.
The remote mode suggests connection to the system via the Internet. At that the external IP-address or the domain name of the system to which you need to connect have to be used.
 In iRidium Wi-Fi/3G CANNOT be switched automatically. For switching between the Internet and the local network you need buttons with special settings. See the settings below.
 To control the system remotely you have to open the system for external access -
to set up the Port Forwarding Service.
 To secure equipment from unauthorized access we recommend using secure connection with the remote system (VPN).
Setting up of the switch Wi-Fi/3G in iRidium projects:
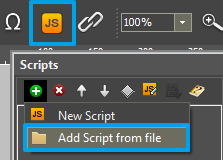
1. Open the script editor in iRidium GUI Editor.
2. Download and add into your project the template of the Wi-Fi/3G switch (Add Script from file):
download the template of the Wi-Fi/3G switch
The Wi-Fi/3G switch is performed with the help of the script function SetParameters
Setting up of parameters of the Wi-Fi/3G switch:
- function Internal_1() // Function name
- {
- IR.GetDevice('EPSNET (UDP)').SetParameters({Host: '192.168.0.66', Port: '61682', UpdateTime: '1000'}); // Driver Name + Parameters
- }
- function External_1()
- {
- IR.GetDevice('EPSNET (UDP)').SetParameters({Host: '220.115.10.10', Port: '61682', UpdateTime: '1500'});
- }
Indicate in the command settings:
- Function name – the name of the switch function (command). Two functions cannot have the same name in a project.
- Driver Name – the name of the driver which parameters are changed
- Parameters – the set of the switch parameters which you need to apply to the driver
Assign commands to buttons:
- Select the button which will be responsible for the Wi-Fi/3G switch.
Open the properties of the button: Object Properties > Programming - Open Macros Editor of the button for the Press or Release events
- Select the Script Call command and add it by double-clicking on it
- Select the name of the function you want to activate in the drop-down list. Create the command.
Set up access to the equipment from the Internet:
In order to do that open the equipment ports for remote access.
Download the example of the Wi-Fi/3G switch (project) >>
Principles of Sending Commands to Controllers
To send commands and receive data about the state of equipment in the bus the EPSNET driver has 2 tabs:
- Commands – commands for setting up values of controlled variables
- Feedbacks – channels receiving feedback from controlled variables
You can control separate devices or groups of devices in the system. It is defined by commands set up in iRidium GUI Editor. The list of the available commands is in the drop-down list shown at the command setting up.
You can find information about controlling controller variables in the section
EPSNET: Examples of Controlling Registers
Emulation of Project Work
Emulator
- is an iRidium application for Windows which can be launched from GUI Editor for testing your projects. Emulator can work both with a license (with connection to the equipment) and without it (when only the project graphic part is functional).
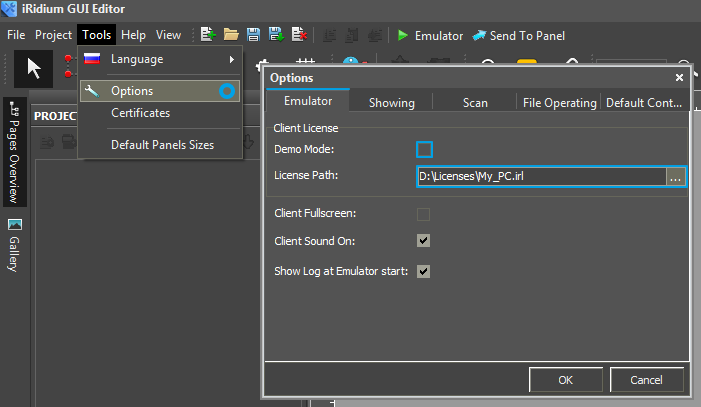
Operation modes for Emulator (see GUI Editor > Tools > Options > Emulator):
- Without the license (Demo Mode: on) – no connection with the controlled equipment.
- With the license (License Path: [...]) – when the license file is selected, all Emulator functions work and there is connection with the controlled equipment.
Indicate the path to the license file for Emulator (GUI Editor > Tools > Options > Emulator):
* When Demo Mode is activated Gui Editor won’t show the message about starting without the connection to the controlled equipment (without a license). Check if there is a license when setting up your project.
Emulator hot keys
- Click F5 to start Emulator.
- Click F8 to open the Emulator settings (password: 2007)
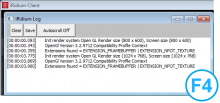
- Click F4 to open the Emulator log.
| For fully functional work of iRidium on your PC it is required to get an iRidium license and activate it for for your PC. Activation of licenses for iPad/iPhone/Mac/Android based or other devices does NOT lead to the automatic licensing of the PC with the installed iRidium Environment. A license for your PC is required for iRidium client on your PC (including Emulator) to work in the fully functional mode. The license should be purchased separately or you can use free For testing purposes you can use free licenses). |
Logging in Windows
iRidium Log is a window where information about iRidium work, error messages and iRidium Script logs (IR.Log) are output in the text format.
To open the iRidium log in Windows, click F4.
Launching Projects on Control Panels
Uploading and launching of iRidium projects on control panels are performed with the help of the iRidium Transfer application installed on your PC. You can also upload your project on the panel from GUI Editor with the help of Transfer.
- Instructions for setting up properties of the iRidium project launch on control panels: Properties for Launching iRidium Projects
- Instructions for uploading iRidium projects on control panels: iRidium Transfer.
- Instructions for setting up iRidium projects on control panel: iRidium App
