IRidium App

|
i2 Control V2.2 the client for iOS/Windows/Android/OS X actual version: 2.2 |
i2 Control V2.2 is installed from AppStore, Google Play or iRidium mobile web site separately for each operating system |
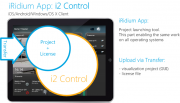
i2 Control V2.2 is a client application inside which you can launch the iRidium visualization interface. The i2 Control V2.2 application displays the graphic part of the visualization project, enables work of drivers and scripts – connection with controlled equipment. Any iRidium visualization project can be launched on all supported OS.
The visualization project can be changed only in iRidium GUI Editor on PC.
Contents
Installation and setting up of the i2 Control V2.2 application on different OS:
How to get a fully-functional project in i2 Control V2.2:
- Register on the iRidium mobile web site
- Download and install iRidium Environment for PC
- Get free licenses for testing or commercial licenses
- Download and install i2 Control V2.2 on devices where iRidium projects have to work
- Create a visualization project for control panels
- Set up equipment control in the visualization project
- Add the project and license in iRidium Transfer
- Upload the project and license on the control panel - в i2 Control V2.2
- Deactivate the project update function in the i2 Control V2.2 settings to launch the project faster
How to upload the project and license in i2 Control V2.2:
The project can be uploaded on the control panel from PC with the help of iRidium Transfer or by the link from the remote resource (НТТР/HTTPs). The i2 Control V2.2 application supports upload of several projects.
Indication of the i2 Control V2.2 Status in Transfer
The indicator of the panel status displays the connection mode of i2 Control V2.2 to iRidium Transfer.
For project update on the panel to work, the indicator inTransfer has to be green (On) - the i2 Control V2.2 application is launched and opened on the panel:
Meanings of the panel status indicator in Transfer:
Deactivation of the Project Update Function on the Panel
It is possible to manage the function of project upload in i2 Control V2.2. When you deactivate the update you fasten the launch of i2 Control V2.2 as the application stops waiting for project upload Transfer. It is required after finishing work on the project.
The change of the update mode can be performed only in the i2 Control V2.2 settings on the control panel.
To open the i2 Control V2.2 settings, click "Show System Menu" (the right click menu in Transfer):
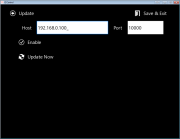
The Update properties in the i2 Control V2.2 settings:
- Enable: Yes/No - enable/disable project update
- Update Host – the IP-address of the PC with running iRidium Transfer.
- Update Port – the ТСР порт though which project update is performed. By default it is 10000.
If you need to change the update port, do it in the Transfer settings and restart both applications. - Update Now – the command for the forced update
- Unmark the "Enable" checkbox right after the upload of the final project version on the control panel
- It will fasten the application launch. The checkbox can always be marked again in the i2 Control V2.2 settings.
Controlling Equipment via the Internet
The i2 Control V2.2 application can work with your equipment locally or remotely. To set up remote control, follow instructions for your equipment or general recommendations through the example of the AV & Custom Systems driver.
If the control panel should hold the connection with the system when the panel is out of the limits of the Wi-Fi network of the system, you need to set up the switch between the Internet and the local network.
The remote mode suggests connection to the system via the Internet. At that the external IP-address or the domain name of the system to which you need to connect have to be used.
 In iRidium Wi-Fi/3G CANNOT be switched automatically. For switching between the Internet and the local network you need buttons with special settings. See the settings below.
 To control the system remotely you have to open the system for external access -
to set up the Port Forwarding Service.
 To secure equipment from unauthorized access we recommend using secure connection with the remote system (VPN).
Setting up of the switch Wi-Fi/3G in iRidium projects:
1. Open the script editor in iRidium GUI Editor.
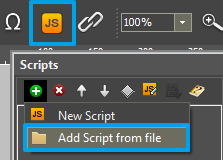
2. Download and add into your project the template of the Wi-Fi/3G switch (Add Script from file):
download the template of the Wi-Fi/3G switch
The Wi-Fi/3G switch is performed with the help of the script function SetParameters
Setting up of parameters of the Wi-Fi/3G switch:
- function Internal_1() // Function name
- {
- IR.GetDevice('AV & Custom Systems (TCP)').SetParameters({Host: "192.168.0.100", Port: "10005"}); // Driver Name + Parameters
- }
- function External_1()
- {
- IR.GetDevice('AV & Custom Systems (TCP)').SetParameters({Host: "220.115.10.10", Port: "10005",});
- }
Indicate in the command settings:
- Function name – the name of the switch function (command). Two functions cannot have the same name in a project.
- Driver Name – the name of the driver which parameters are changed
- Parameters – the set of the switch parameters which you need to apply to the driver
Assign commands to buttons:
- Select the button which will be responsible for the Wi-Fi/3G switch.
Open the properties of the button: Object Properties > Programming - Open Macros Editor of the button for the Press or Release events
- Select the Script Call command and add it by double-clicking on it
- Select the name of the function you want to activate in the drop-down list. Create the command.
Set up access to the equipment from the Internet:
In order to do that open the equipment ports for remote access.
Download the example of the Wi-Fi/3G switch (project) >>
Updating Projects via the Internet
Set up updating projects via the Internet. In order to do that you need to:
- set up the system menu of the project, when the control panel and PC with iRidium Transfer are in one IP network
- set up the router for remote access to the controlled equipment
Local and Remote Debugging of i2 Control V2.2 (logging)
Logging in Windows
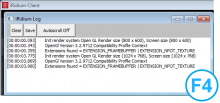
iRidium Log is a window where information about iRidium work, error messages and iRidium Script logs (IR.Log) are output in the text format.
To open the iRidium log in Windows, click F4.
Remote logging in iOS/Android/OS X
iRidium Log in iOS/Android/OS X is a system journal which iRidium can send to Syslog Server via IP. iRidium Log is used for troubleshooting and script debugging. It can be send to the Syslog Server installed on your PC.
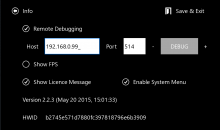
Activate the Remote Debugging function in the i2 Control V2.2 settings.
- 192.168.XX.XX – the local IP-address of the PC with Syslog Server
- 514 – the port of Syslog Server listener
- 8 – the logging depth (1 – the most critical messages, ... , 8 – all messages)
- ON – logging activation
- Click Apply and restart i2 Control V2.2.
Set up the Syslog server:
Install and set up any Syslog server for Windows on your PC, for example, www.winsyslog.com.
Restart i2 Control V2.2 and the application will start sending the system journal to the Syslog server on your PC.
Android Debugging via USB
It enables you to save the log of i2 Control V2.2 work on the Android based tablet or smart phone as a text file. The saved log can be used for detecting errors in the program work.
Licensing of i2 Control V2.2
A license for i2 Control V2.2 is an *.irl file which is uploaded i2 Control V2.2 via the iRidium Transfer application. The license file is uploaded on the control panel only with an iRidium project (*.irpz) – the visualization interface. On the control panel the license file enables connection to the equipment set up in the project.
A license can be assigned to HWID – the control panel identifier. Such license is called "Device License" and it can work only on this control panel.
A license can be assigned to Serial number –the serial number of one of the controllers of your installation: AMX, Crestron, KNX, KNX IP BAOS, HDL, Global Cache, Helvar. Such license is called "Site License" and it can be uploaded on any control panel as it is not related to HWIDs (panel identifiers). Thus, you can connect any panel to the licensed controller. Do not forget that Site licensing is supported only by a limited list of controllers and systems: AMX, Crestron, KNX, KNX IP BAOS, HDL, Global Cache, Helvar.
If a control panel or controller are broken and have to be substituted by a new one, you can transfer your license to the new device for free in your MY ACCOUNT section on the iRidium mobile web site.
To buy a license, you can use an online form or request an invoice. After the payment you will receive an activation key with which you will be able to activate the license – to assign it to your MY ACCOUNT section and HWID (or Serial Number). When the license is assigned to the control panel or controller, it can be downloaded from the web site as an *.irl file and upload it on your control panel via iRidium Transfer.
